


How to connect to Kryptex Pool directly
What does it mean — connect directly?
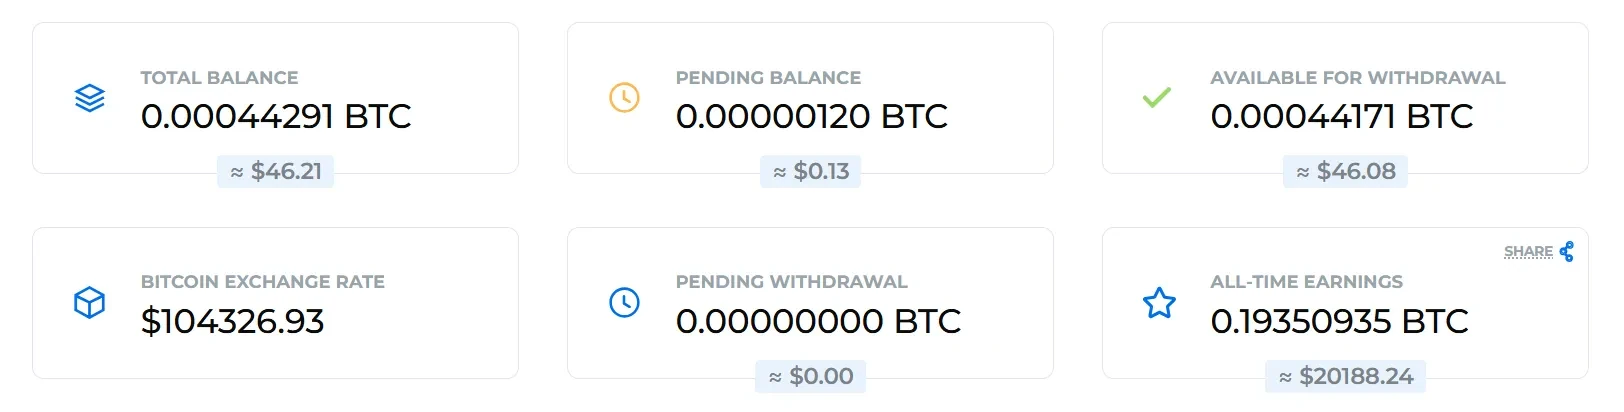
It means that you can mine directly to your Kryptex account without Kryptex app. All your earnings will be stored at your account and converted into Bitcoin.
Using this method, you can mine the cryptocurrency listed in the table below.
From your account, you can order payments in several ways:
- in Bitcoin BTC (including Bitcoin Lightning Network);
- in Ethereum ETH;
- in Litecoin LTC;
- in USDT (BEP20, TRC20);
- in USDC (Solana);
- BNB (Smart Chain);
- TRX (Tron);
- Volet.com payouts;
- Bitrefill payouts;
- PayPal US.
How to receive payouts in Bitcoin?
Quick Guide for Experienced Miners:
- Sign up at kryptex.com and verify your email.
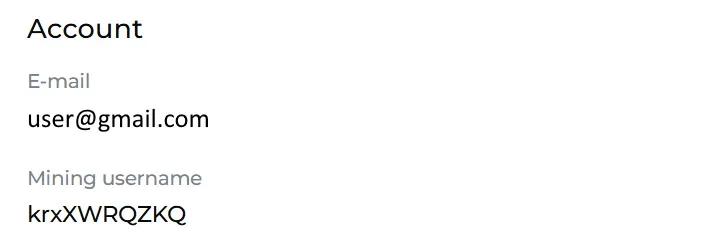
Use your unique
Mining usernameas your wallet address. You can find it in your profile.Although you can use your email, we recommend the username for greater flexibility.
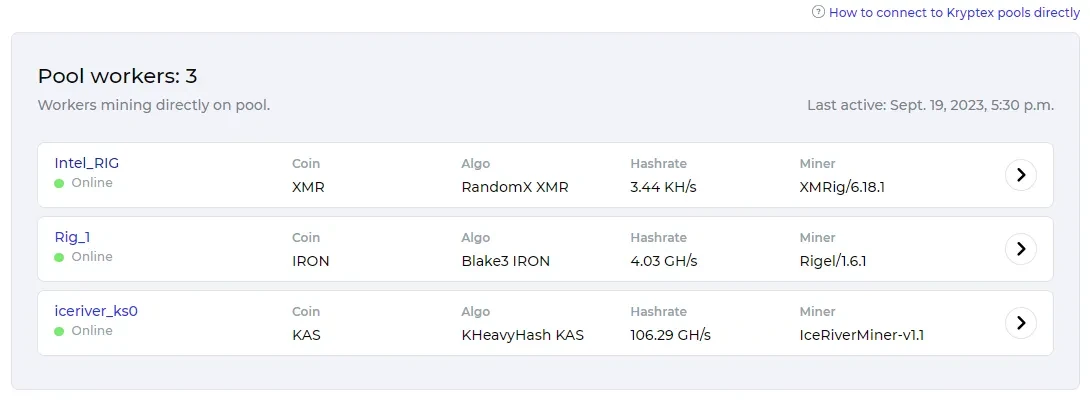
Start mining, and within a few minutes, your worker will appear in the "Pool Workers" section of your Kryptex account.
Available connection options:
krxXXXXXXkrxXXXXXX/Worker1krxXXXXXX.Workerkrxxxxxxx.WorkerKRXXXXXXX.Worker
How to connect?
- Choose the coin you want to mine.
- You can find the full list of supported coins on the Kryptex pool main page or in the table below.
- Configure your miner, operating system, or ASIC with the address of your chosen coin.
- You can download the miner for your selected coin or find detailed setup instructions on its dedicated page.
- Enter your
Mining Usernameas the wallet address for mining.
Mining Username — a unique identifier like krxXXXXXX. You can find it in your profile settings.
Alternatively, you can use your email as the wallet address. However, not all miners support this format. If you choose to use your email, include the worker name by adding a slash. Example: miner@gmail.com/worker.
Worker Name — The rig name should be no more than 32 characters, use only Latin letters, numbers (0-9), and no spaces or special characters. Example: MyRig1.
| Coin | Pool address | Wallet format | Password |
|---|---|---|---|
| BTC+FB | btc.kryptex.network:7014 |
mining_username.worker_name |
x or nothing |
| FB | fb.kryptex.network:7013 |
mining_username.worker_name |
x or nothing |
| BCH | bch.kryptex.network:7015 |
mining_username.worker_name |
x or nothing |
| XEC | xec.kryptex.network:7036 |
mining_username.worker_name |
x or nothing |
| DGB | dgb.kryptex.network:7037 |
mining_username.worker_name |
x or nothing |
| LTC+DOGE+BEL+PEP | ltc.kryptex.network:7016 |
mining_username.worker_name |
x or nothing |
| ALPH | alph.kryptex.network:7010 |
mining_username.worker_name |
x or nothing |
| KAS | kas.kryptex.network:7011 |
mining_username.worker_name |
x or nothing |
| RXD | rxd.kryptex.network:7012 |
mining_username.worker_name |
x or nothing |
| ETC | etc.kryptex.network:7033 |
mining_username.worker_name |
x or nothing |
| ETHW | ethw.kryptex.network:7034 |
mining_username.worker_name |
x or nothing |
| OCTA | octa.kryptex.network:7032 |
mining_username.worker_name |
x or nothing |
| XTM-SHA3X | xtm-sha3x.kryptex.network:7039 |
mining_username.worker_name |
x or nothing |
| XMR | xmr.kryptex.network:7029 |
mining_username.worker_name |
x or nothing |
| SAL | sal.kryptex.network:7028 |
mining_username.worker_name |
x or nothing |
| XTM-RX | xtm-rx.kryptex.network:7038 |
mining_username.worker_name |
x or nothing |
| ZEPH | zeph.kryptex.network:7030 |
mining_username.worker_name |
x or nothing |
| CFX | cfx.kryptex.network:7027 |
mining_username.worker_name |
x or nothing |
| XTM-C29 | xtm-rx.kryptex.network:7040 |
mining_username.worker_name |
x or nothing |
| XEL | xel.kryptex.network:7019 |
mining_username.worker_name |
x or nothing |
| IRON FISH | iron.kryptex.network:7017 |
mining_username.worker_name |
x or nothing |
| RVN | rvn.kryptex.network:7031 |
mining_username.worker_name |
x or nothing |
| PRL | prl.kryptex.network:7048 |
mining_username.worker_name |
x or nothing |
| XNA | xna.kryptex.network:7024 |
mining_username.worker_name |
x or nothing |
| ERGO | erg.kryptex.network:7021 |
mining_username.worker_name |
x or nothing |
| NEXA | nexa.kryptex.network:7026 |
mining_username.worker_name |
x or nothing |
Connect on Windows
Open the page of your desired coin on the Kryptex pool: https://pool.kryptex.com/.
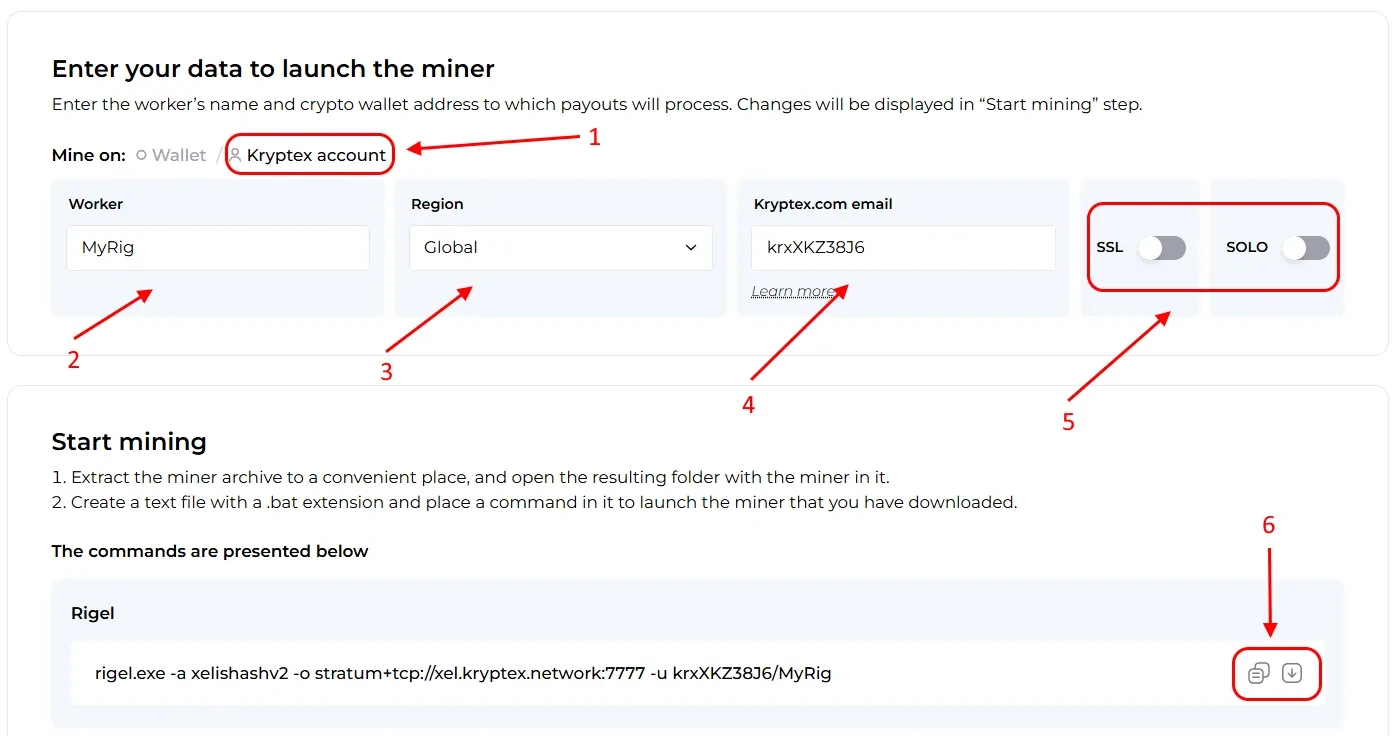
- In the setup tool on the site, select "Kryptex Account" as the payment method.
- In the "Worker" field, enter a name for your rig, such as
MyRig. - In the "Region" field, choose the preferred pool region. If you’re unsure, select
Global. - In the "Wallet" field, input your
Mining Username.- You can find your Mining Username in the Profile section of your account.
- Alternatively, you can use your email address as a wallet, but note that not all miners support this format.
- Optionally, enable SSL for encrypted connections or SOLO mining.
- If you’re unsure what these options mean, leave them as they are.
- Copy the generated command for your miner’s batch file, or download the pre-configured batch file.
That’s it! Launch the batch file, and within a few minutes, your worker will appear in your Kryptex personal account under “Pool Workers”.
Connect on HiveOS
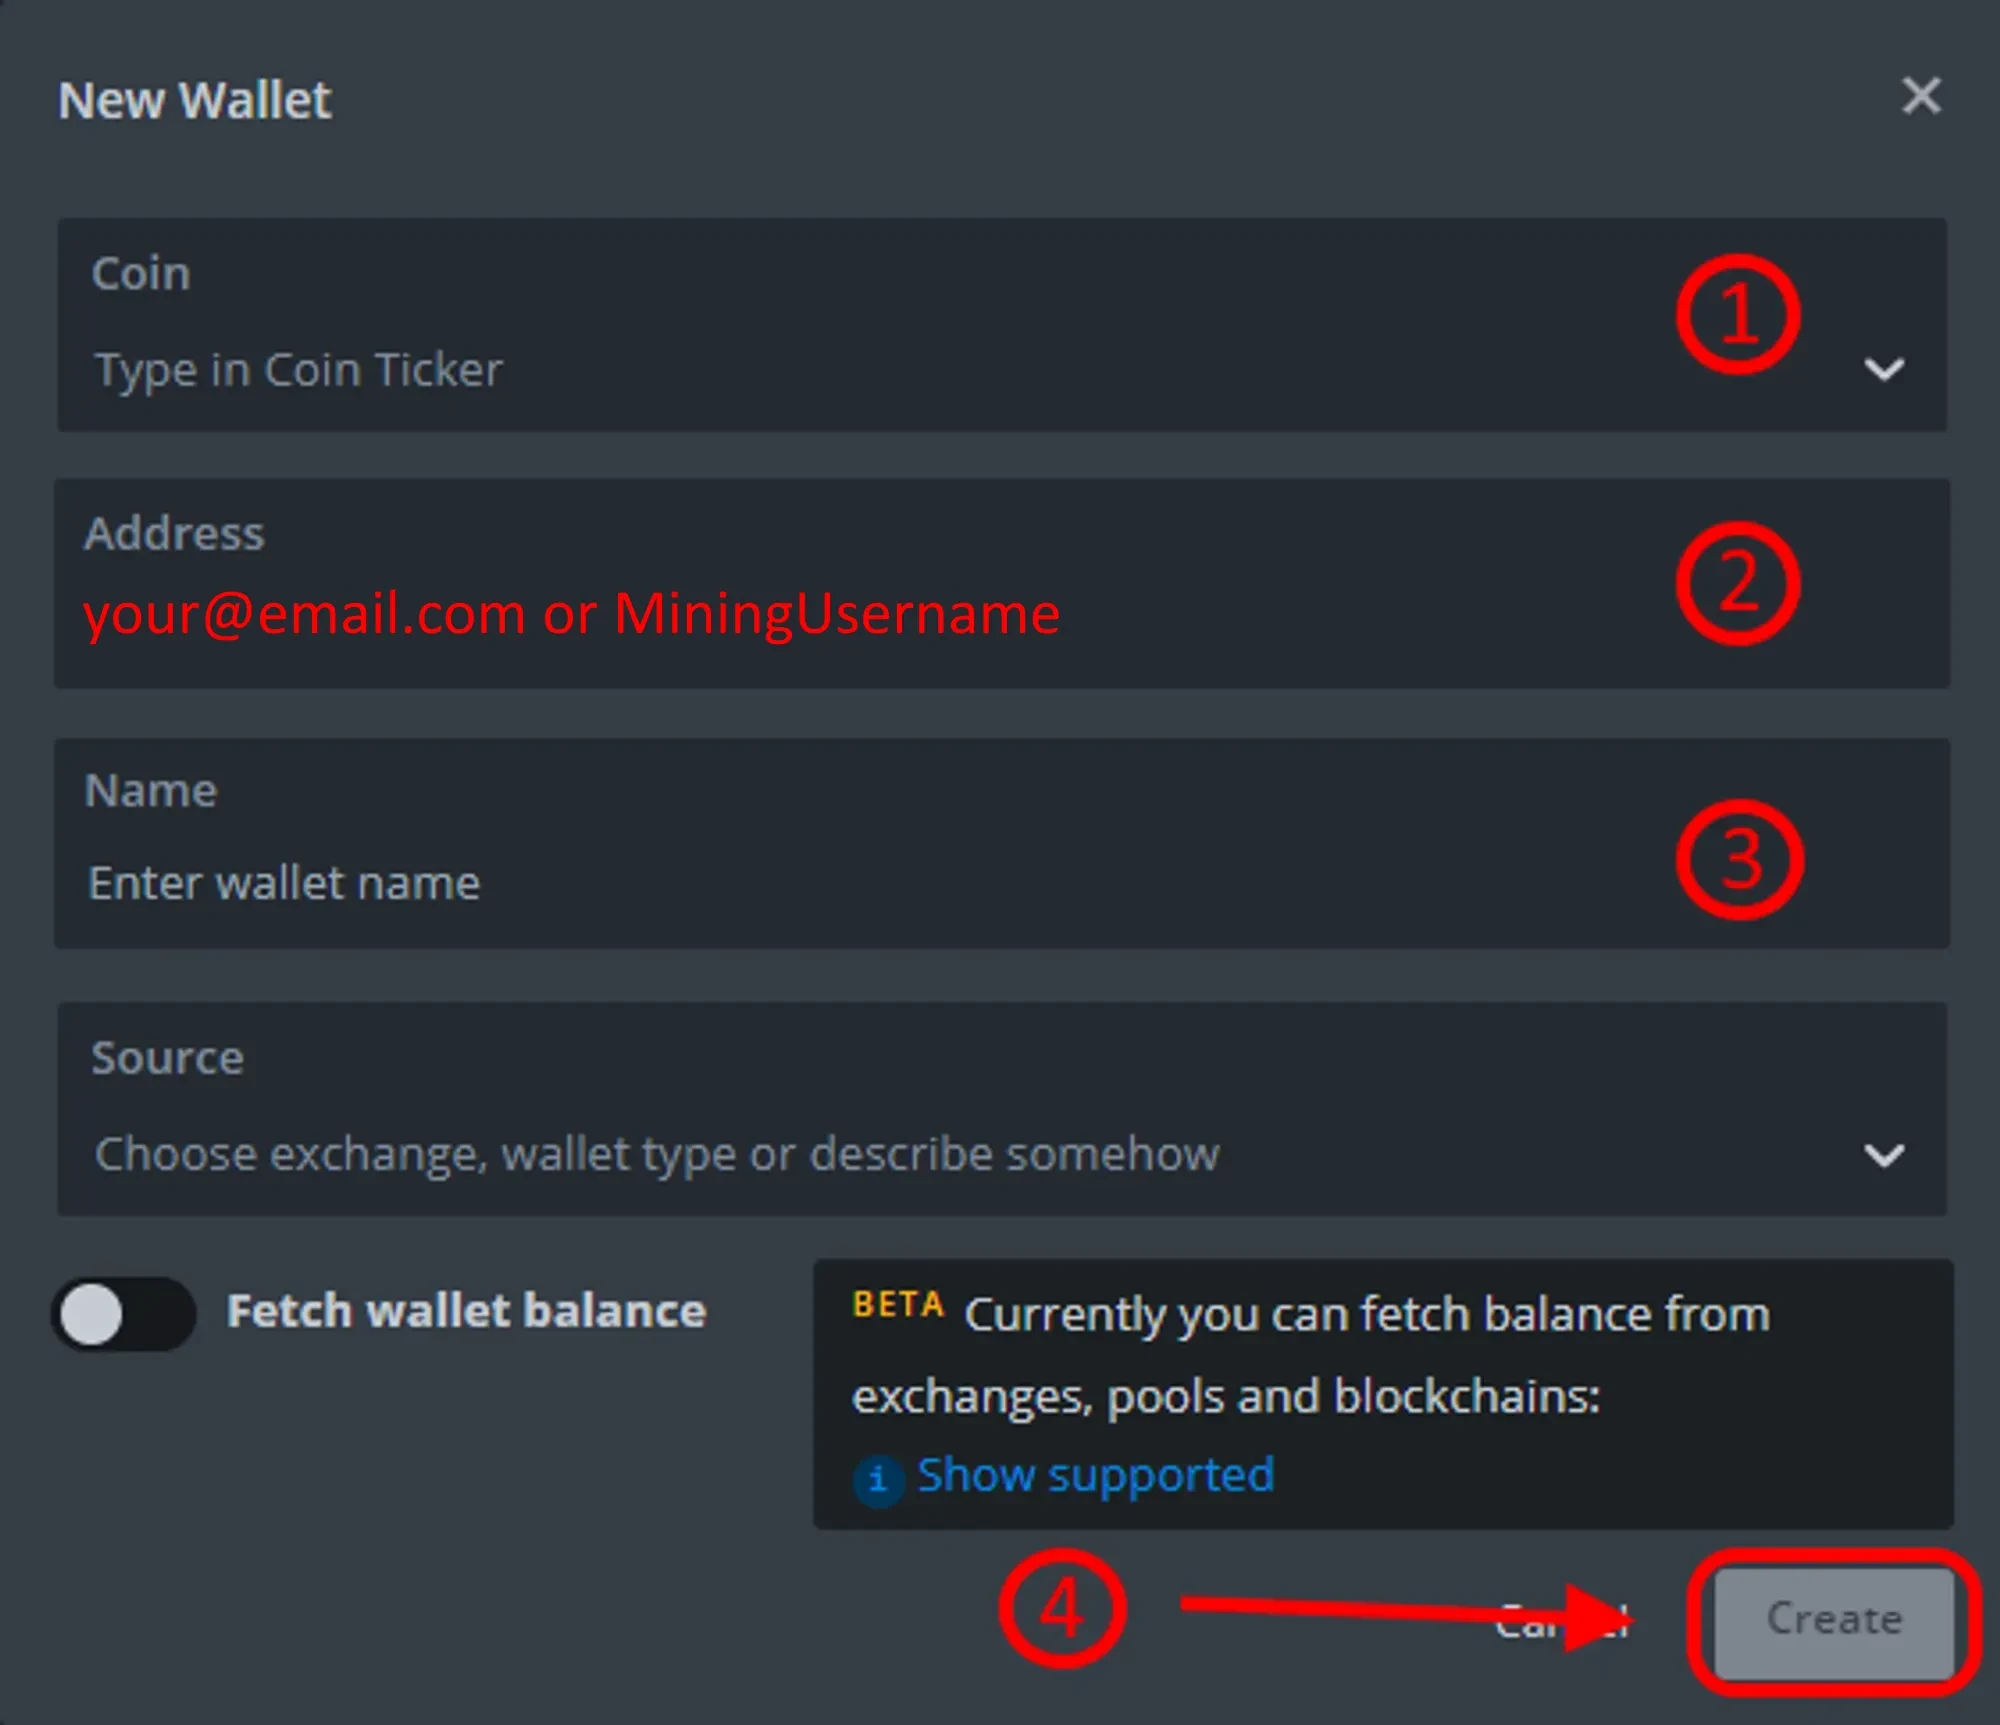
Creating the Wallet
- Choose the coin you want to mine.
- Use your
Mining Usernameas the wallet address. You can find it in your Kryptex profile.- Alternatively, you can use your email as the wallet address, but note that some miners may not support this format.
- Assign a custom name to your wallet.
Confirm the wallet setup.
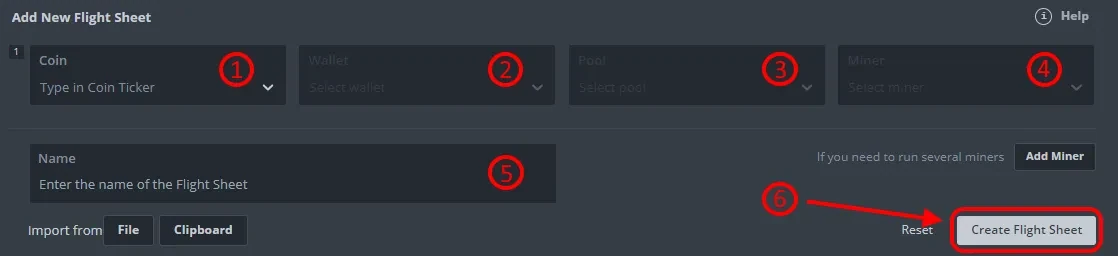
Create the Flight Sheet
- Select the type of coin to mine.
- Choose a pre-created coin wallet.
- From the list of available pools, select the
kryptexpool. Check the pool address for confirmation, and then apply the settings. - Choose the necessary miner.
- Name the Flight Sheet as you wish.
Confirm the creation of the Flight Sheet.
If you specified email as your wallet address:
- Press “Setup Miner Config” to edit miner setting.
Edit “Wallet template” so the wallet address and worker name separated with a slash:
%WAL%/%WORKER_NAME%. Please make sure that you are separating wallet address and worker name with a/slash. If you use a dot as the separation — you will not be able to connect.
Connect the Mining Rig to the Pool
- Select your mining rigs and workers for mining.
Select the Flight Sheet that you have just created.

Press the “Rocket” button to apply the Flight Sheet.
- If set up correctly, your worker will appear in the Pool Workers section of your Kryptex account within a few minutes.
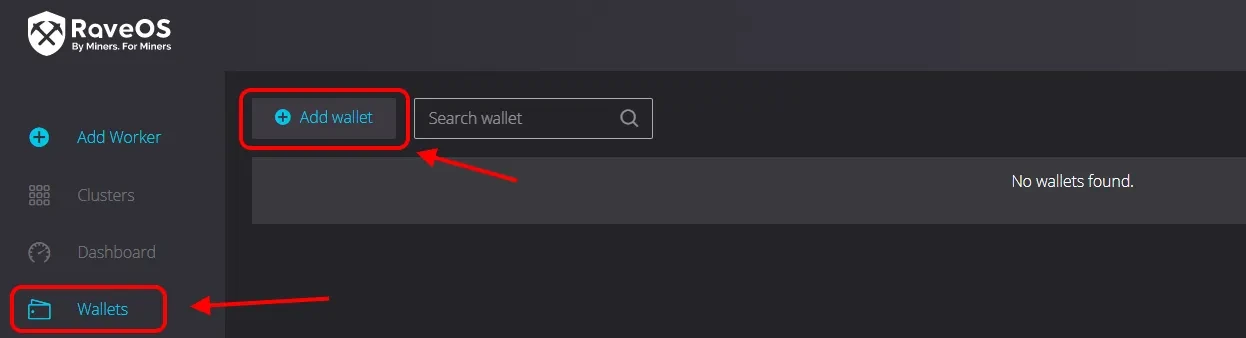
Connect on RaveOS
Creating the Wallet
To add a wallet, select “Wallets” from the left menu, and then click “Add wallet”.
Name the wallet as you wish and press “Add wallet”.

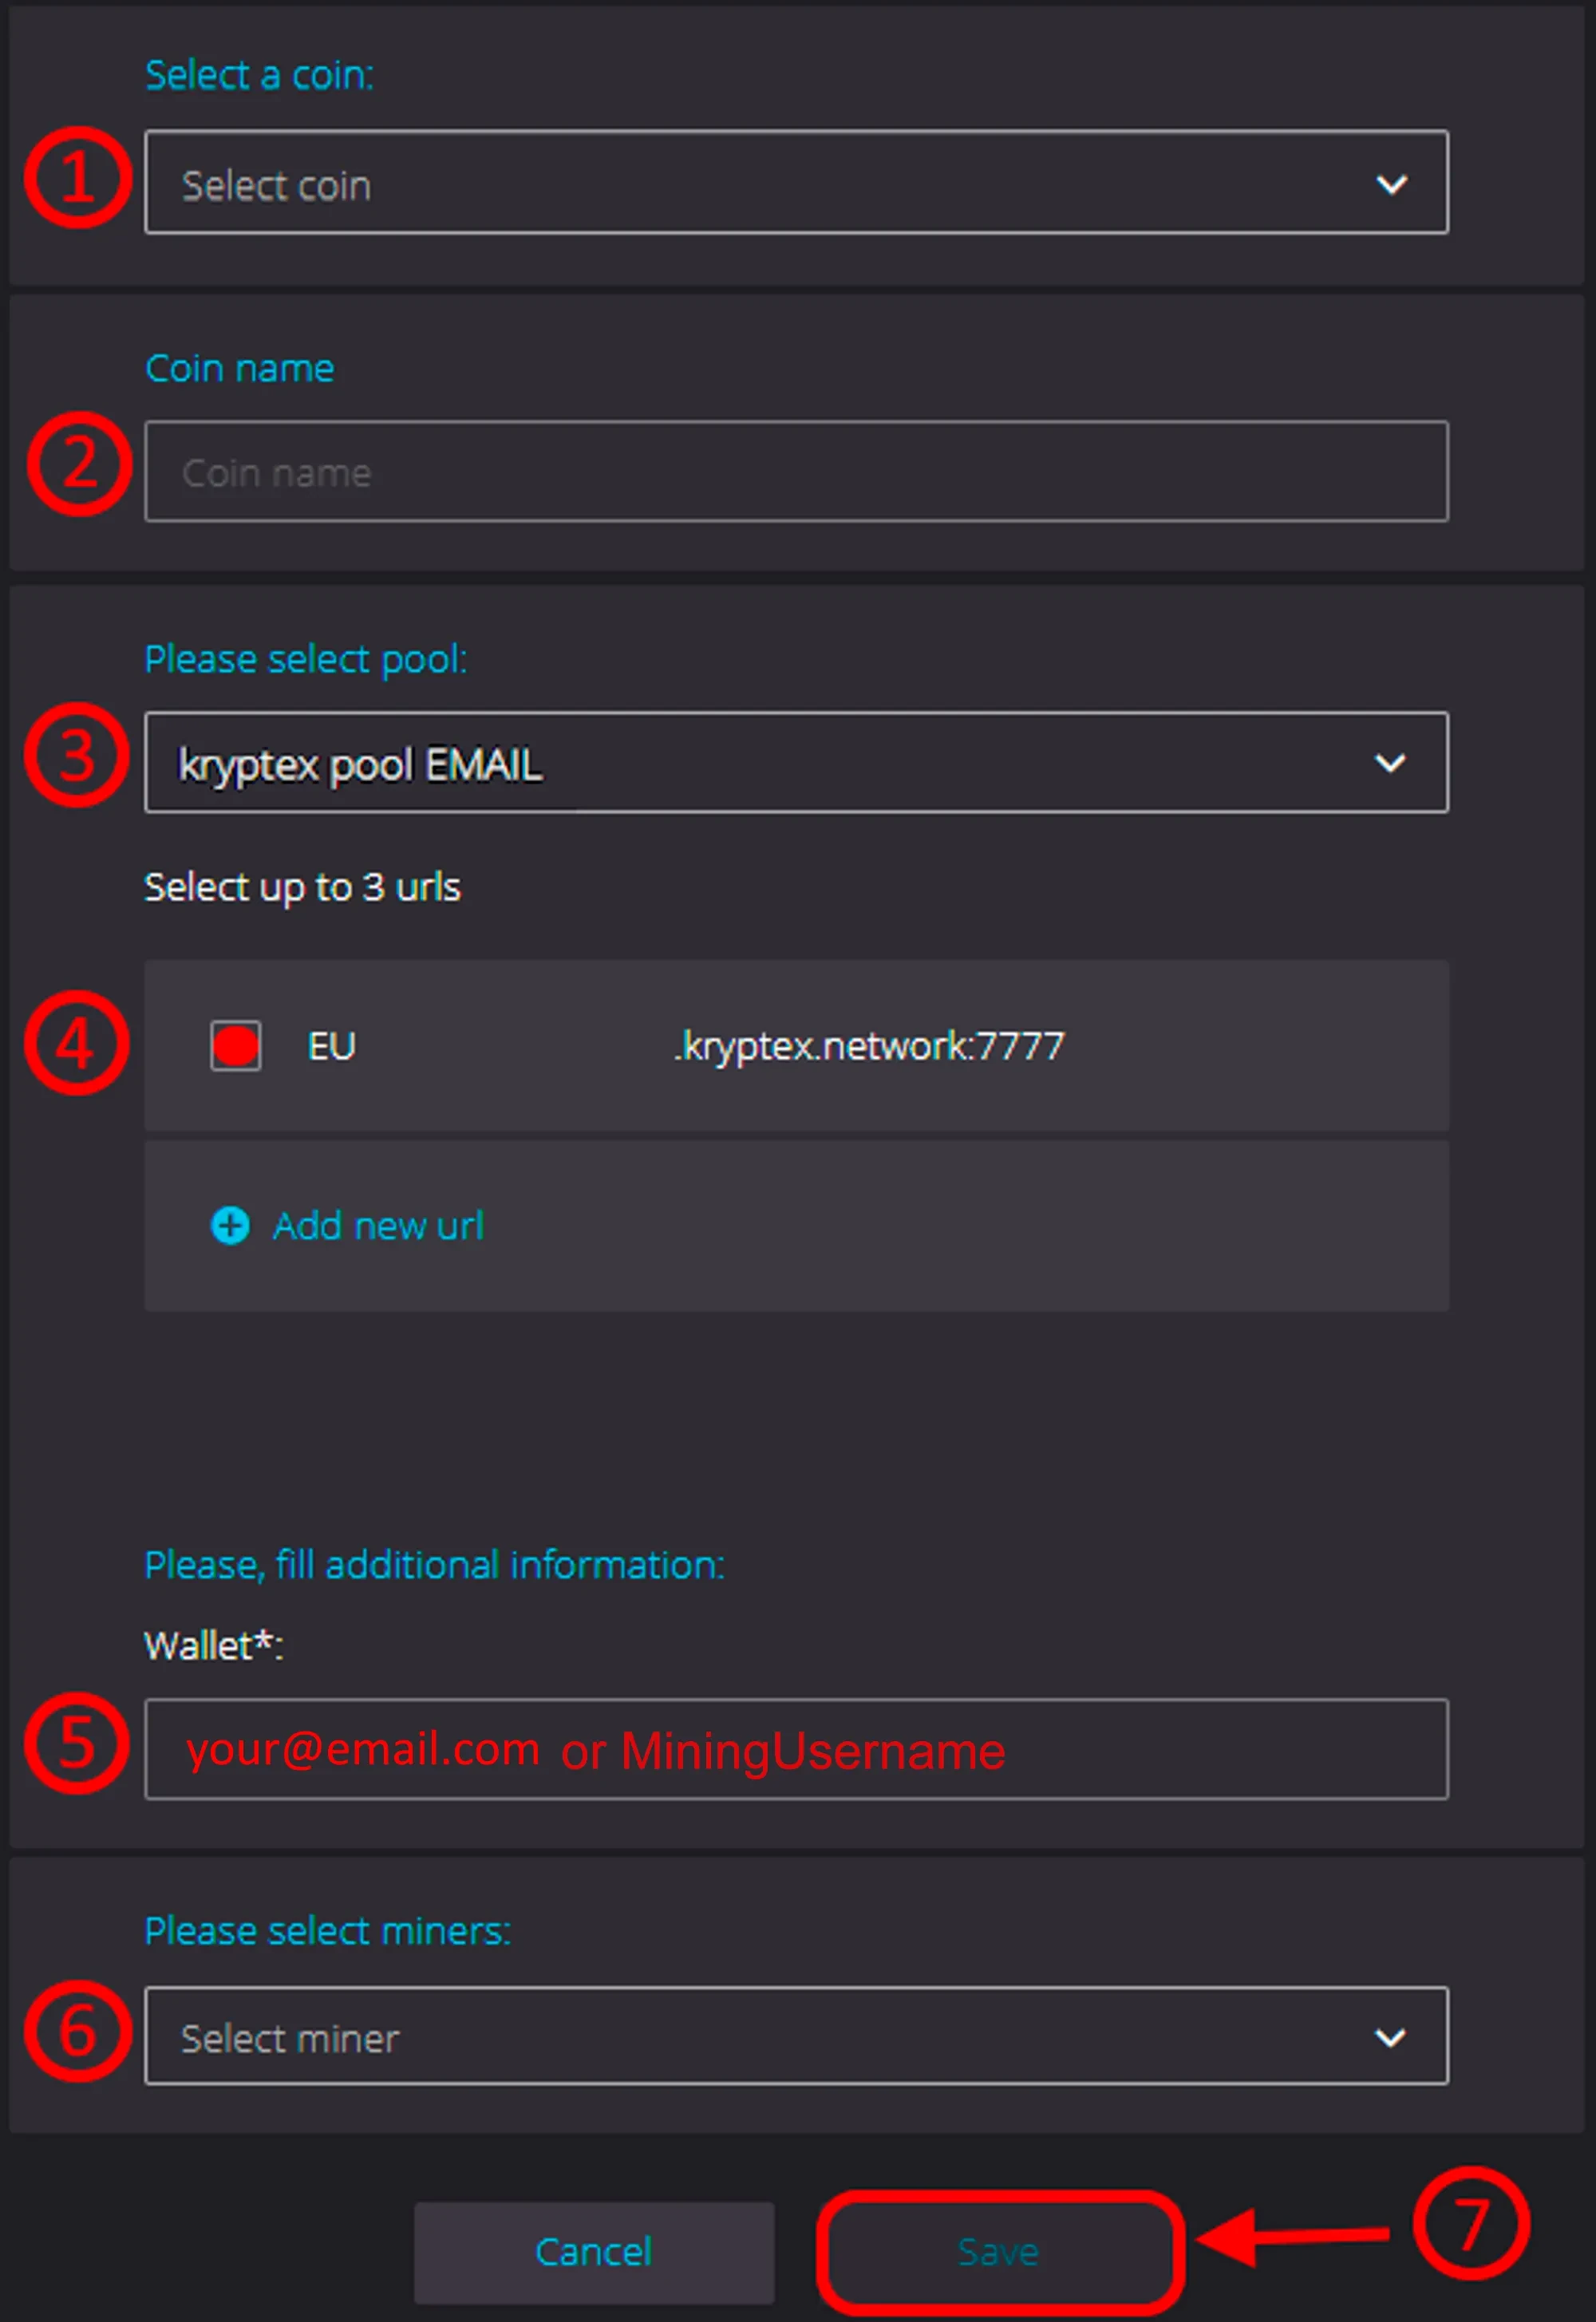
Connection Settings
- Choose the coin type.
- Enter a name for the coin in the field, or leave the default value.
- Select the
kryptex pool EMAILfrom the list of pools. - Check the box next to the address of the selected pool.
- Enter the wallet address in the format
MiningUsername- your username, available in the profile tab. - Choose the necessary miner.
Save your configs.
Connect the Mining Rig to the Pool
- Press the “Dashboard” in the left menu and press the button to show all mining options.
Choose the mining rigs you need and press “Mining” button.
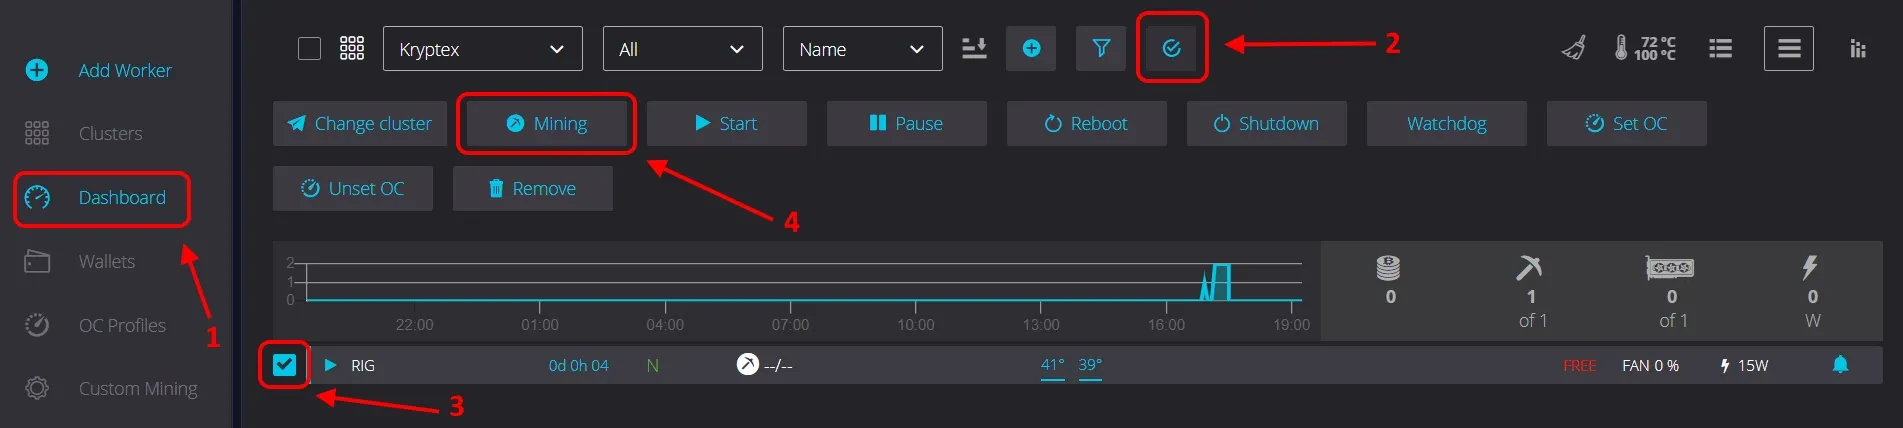
Next, follow these steps:
- Select the appropriate wallet from the “Wallet” drop-down list.
- Select a coin from the “Coin” drop-down list.
Select a miner from the “Miner” drop-down list.
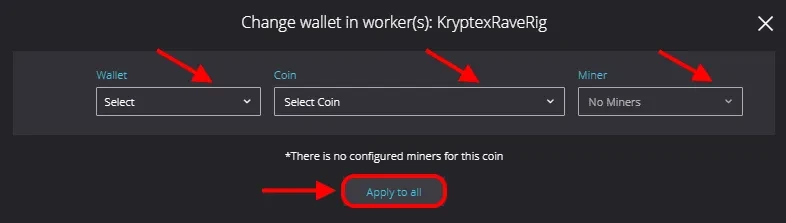
If set up correctly, your worker will appear in the Pool Workers section of your Kryptex account within a few minutes.
Connect on ASIC/FPGA
Choose the coin to mine on Kryptex Pool https://pool.kryptex.com/.
Select the address for the desired pool region. If you're unsure, use the first option on the list.
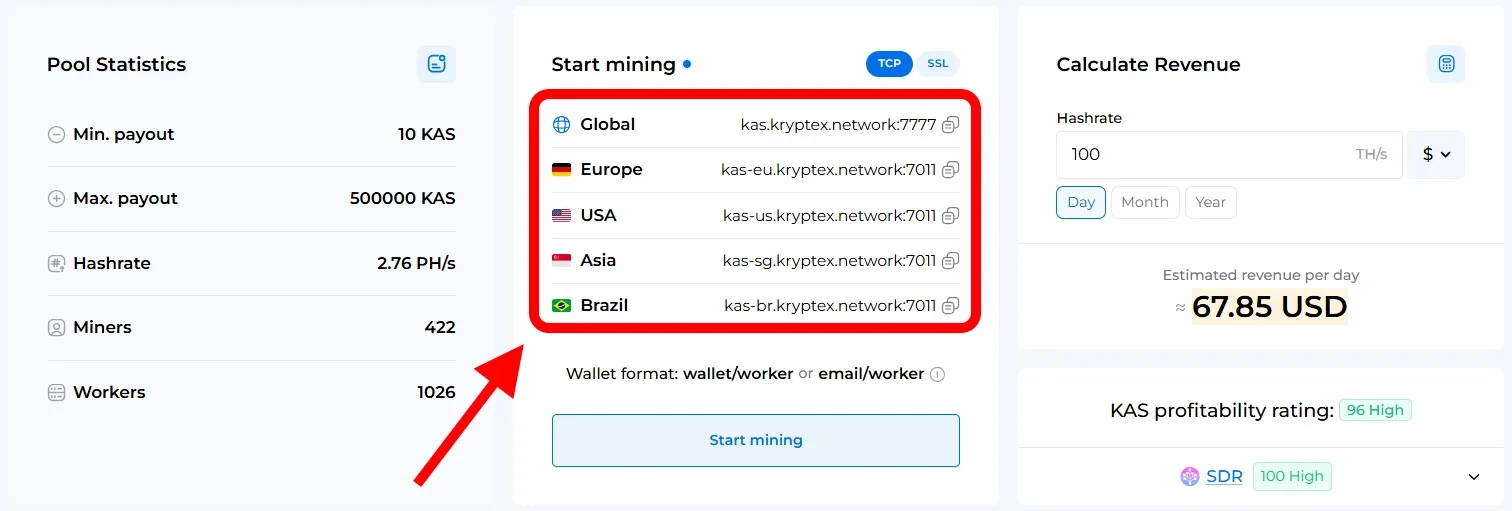
Enter your
Mining Usernameas the wallet address. You can find it in your Kryptex profile.- Alternatively, you can use your email as a wallet address, but note that not all miners support this format.
In the ASIC settings, fill in all three address fields with Kryptex pool settings. Use alternative pool addresses for backup.
This ensures your ASIC automatically reconnects if the main connection is lost.
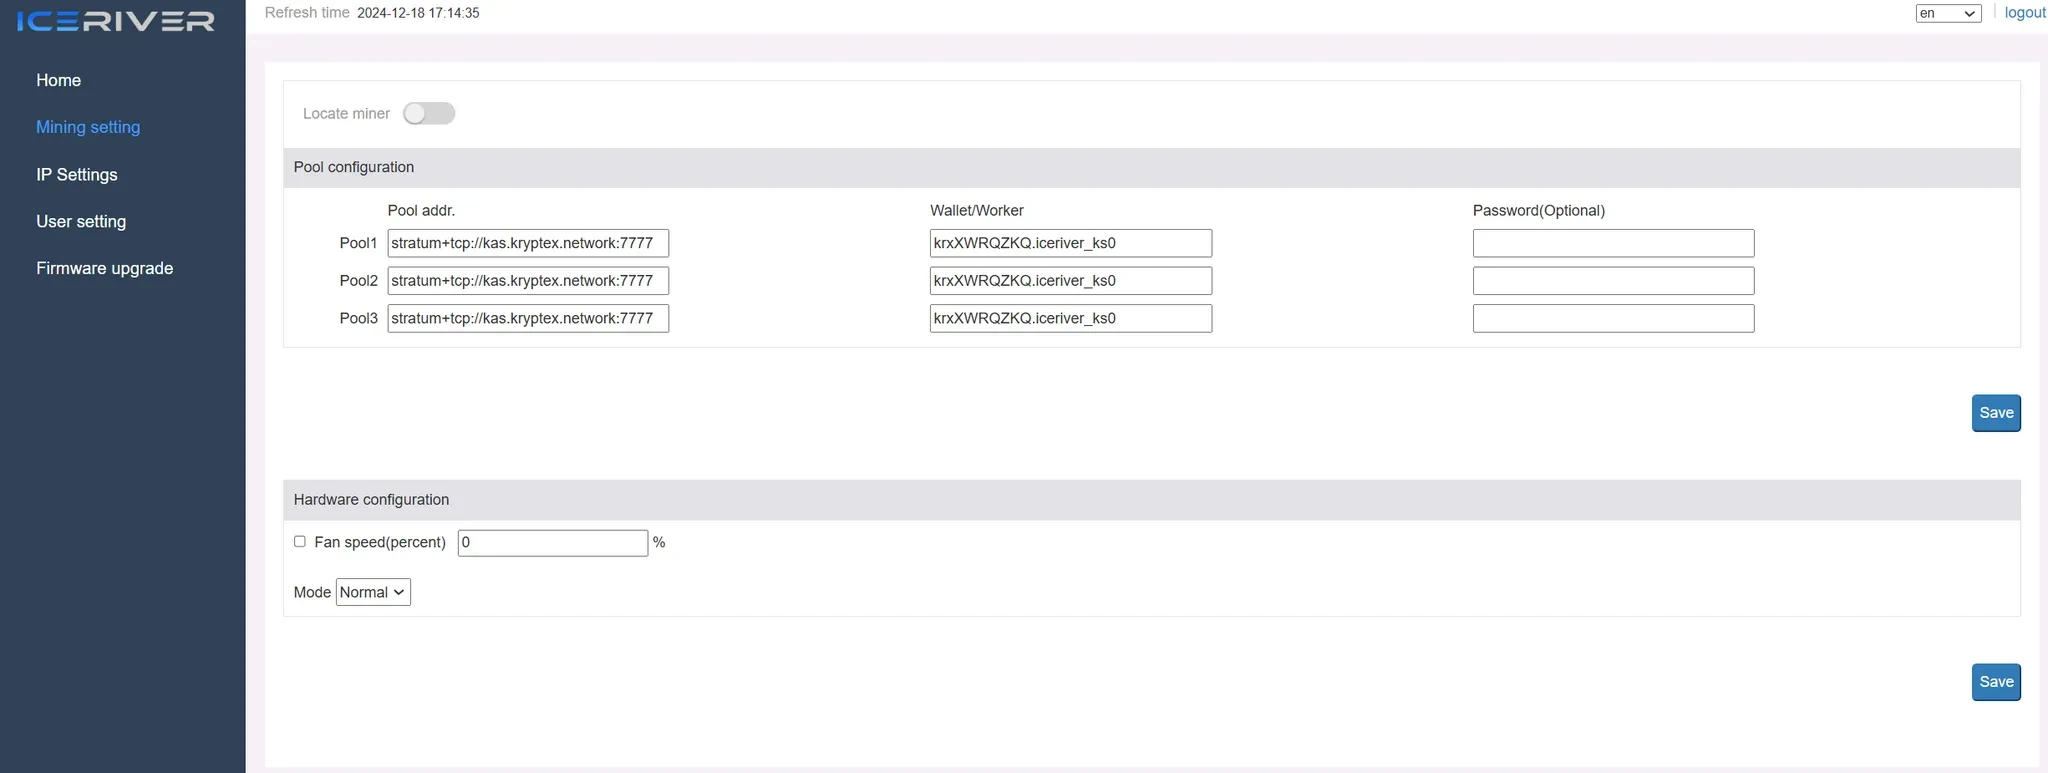
Save the settings and reboot your ASIC.
- Within a few minutes, your worker will appear in the Pool Workers section of your Kryptex account.
❗Important Information
- If you choose to mine with automatic conversion to Bitcoin, all your earnings will be stored in Bitcoin within your Kryptex account.
- We recommend using your
Mining Usernamefrom your profile as your wallet address, as not all miners are compatible with email-based addresses. - Not all coins can be mined and exchanged for bitcoins. Check the table to see which coins are available for automatic exchange.
- When mining with an email-based wallet, ensure the
wallet/workerformat uses a/separator. Incorrect formatting may result in no payouts. - To withdraw funds from Kryptex, email confirmation is required. Make sure your email address was confirmed during registration.
- Farm status information will be visible in your HiveOS or RaveOS dashboard, or directly in your miner’s console.
Need Help?
Have any questions, something is unclear, or you can't connect?
Contact support — we're happy to assist!
- Support Ticket.
- Telegram Support.
- Discord Support.
- Email support at support@kryptex.com.
