


How to increase hashrate on RandomX XMR ZEPH SAL?
Windows background tasks consume your CPU resources and can restrict your CPU hashrate while mining. In this article, we will guide you on optimizing RandomX mining on Windows to maximize your hashrate.
Hashrate serves as a performance indicator for miners. The greater the hashrate, the more coins you can mine, resulting in higher income.
Previously we have told about equipment settings in our article RandomX and RAM.
Kryptex is not liable for any system failures resulting from adjustments to the settings. All modifications are undertaken at your own risk. We highly advise creating a system restore point before implementing any changes. This precautionary step enables you to return to the original state in case of any issues.
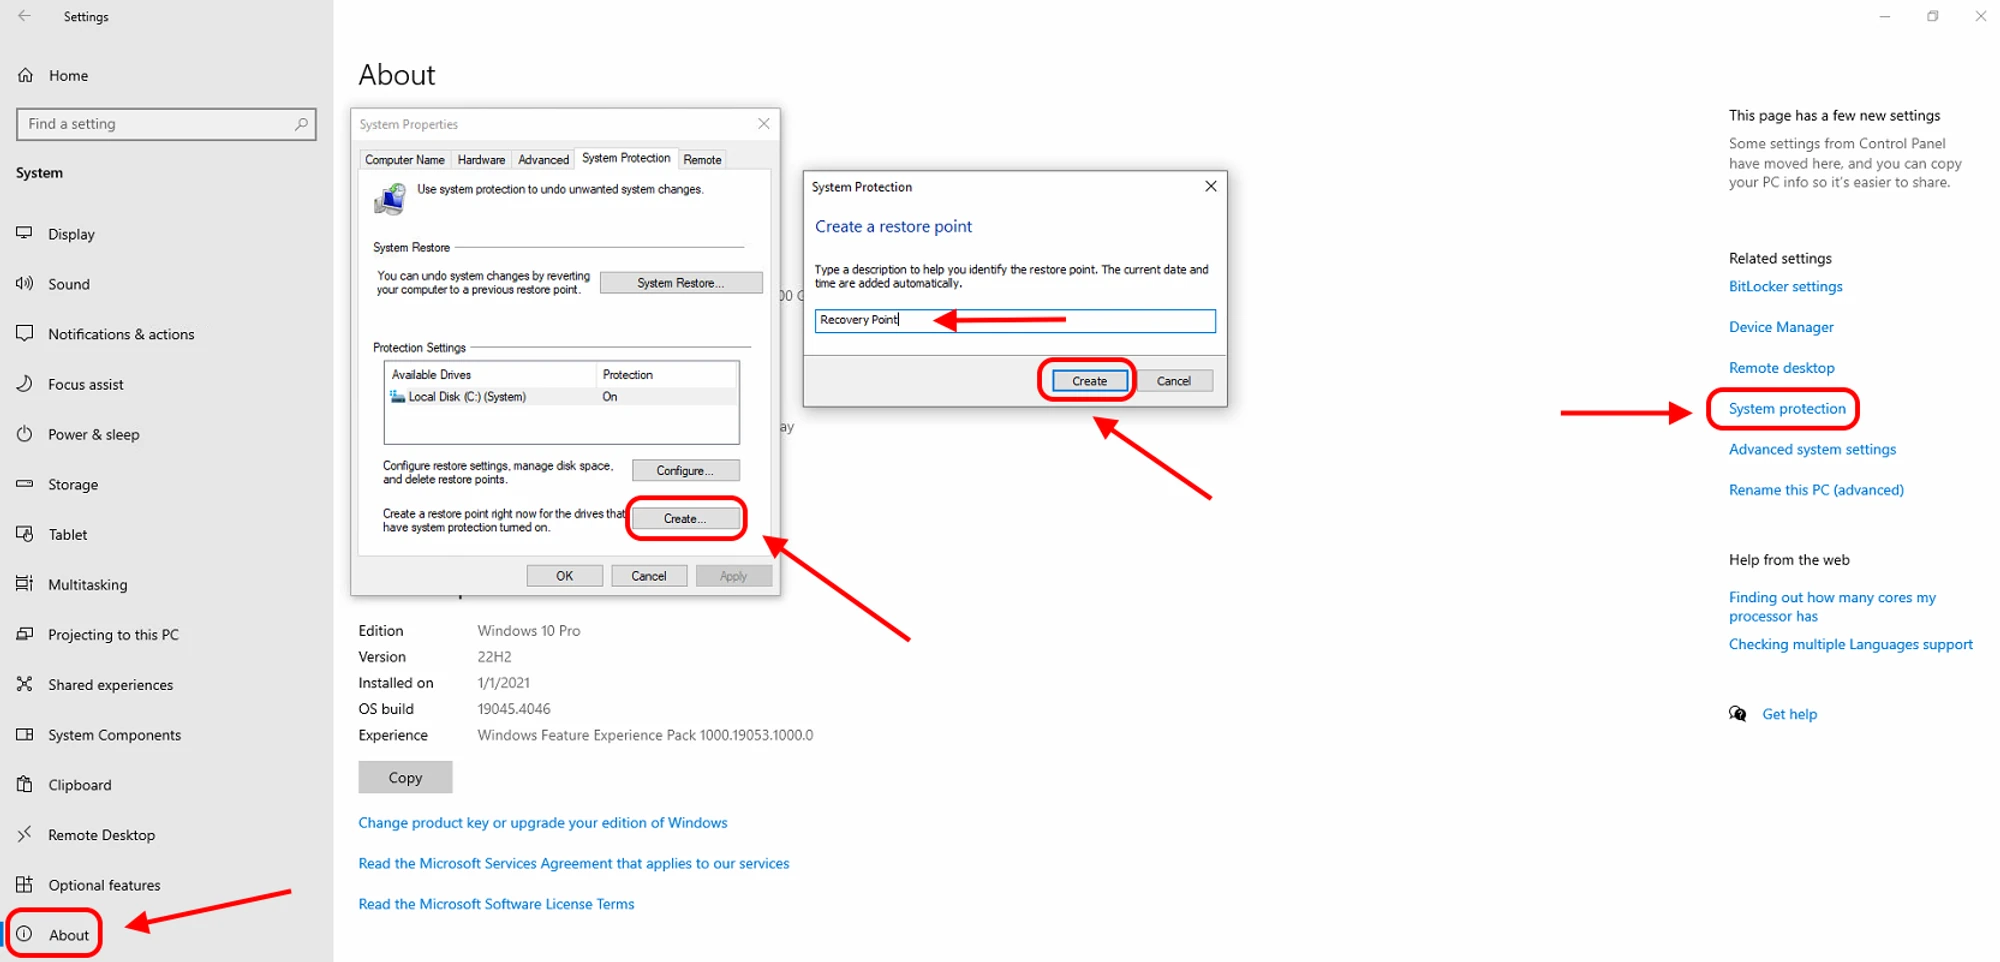
Create a system restore point
- Start Menu → Settings → System → About → System protection.
- Click ”Create”.
- Enter a description for the restore point.
- Click ”Create”.
Close the window.
Miner Settings
Miner Settings — specialized miner commands for fine-tuning. Include these parameters in your batch file or miner settings to optimize and maximize your hashrate.
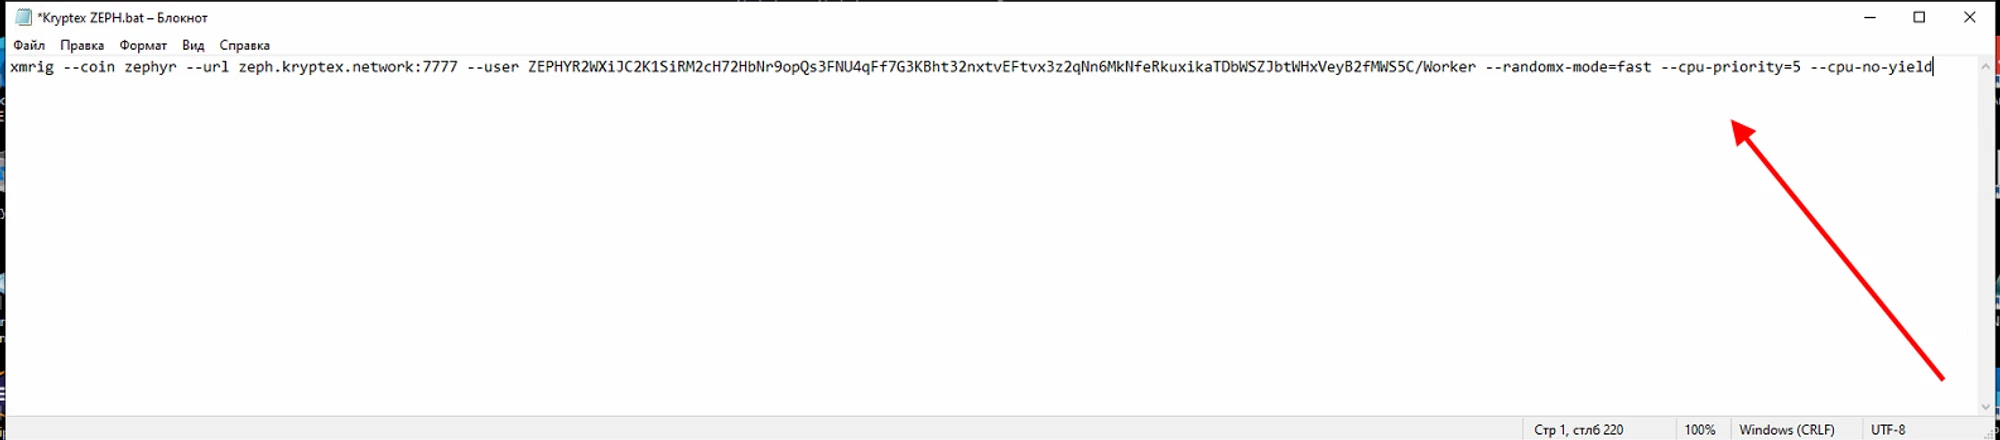
--randomx-mode=fast — maximum intensity for RandomX.
--cpu-priority=5 — the highest mining process priority (minimum 1, maximum 5).
--cpu-no-yield — prefer maximum hashrate rather than system response/stability (please do not use if you are running mining on GPU)
Check developer’s instructions for more settings for XMRig fine-tuning — https://xmrig.com/docs/miner/command-line-options
Miner settings in the Kryptex App
- Ensure that you have enabled PRO mode.
- Open Kryptex settings, “Mining” section, scroll down to find XMRig.
Mark the argument line and input the necessary arguments (avoid using extra spaces or indents, as the miner may interpret them as errors and fail to start).

Kryptex Setting
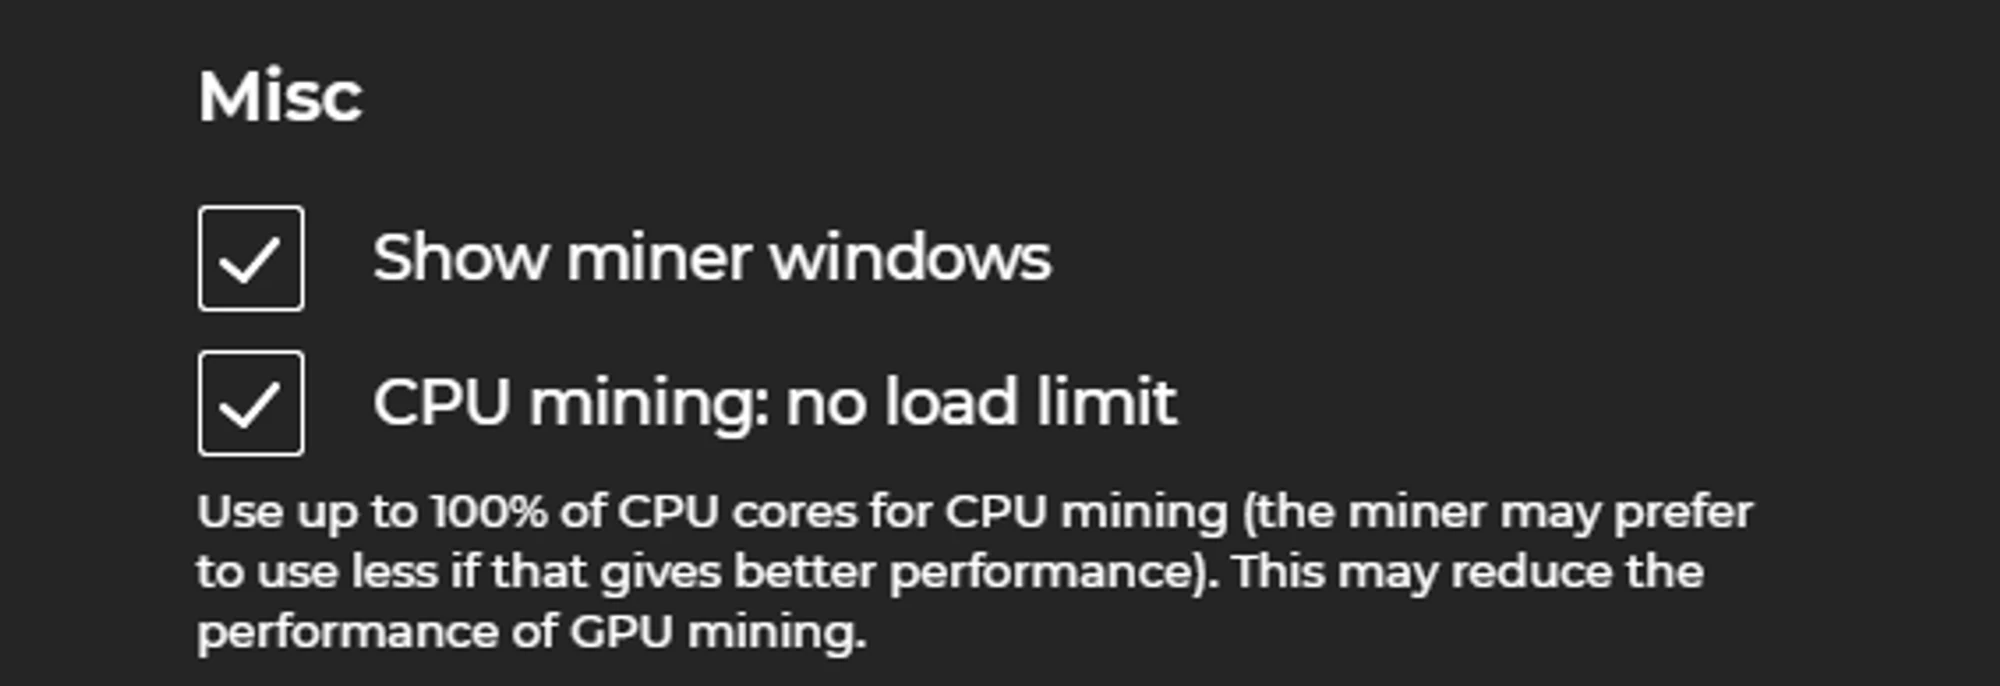
By default, Kryptex restricts your CPU usage to 75% to ensure there are sufficient resources for operating system tasks and video card monitoring. If you wish, you can disable this restriction.
- Ensure that you have enabled PRO mode.
- Open Kryptex settings, “Mining” section, and navigate down the list.
In the “Misc” section, tick the “CPU mining: no load limit” checkbox.
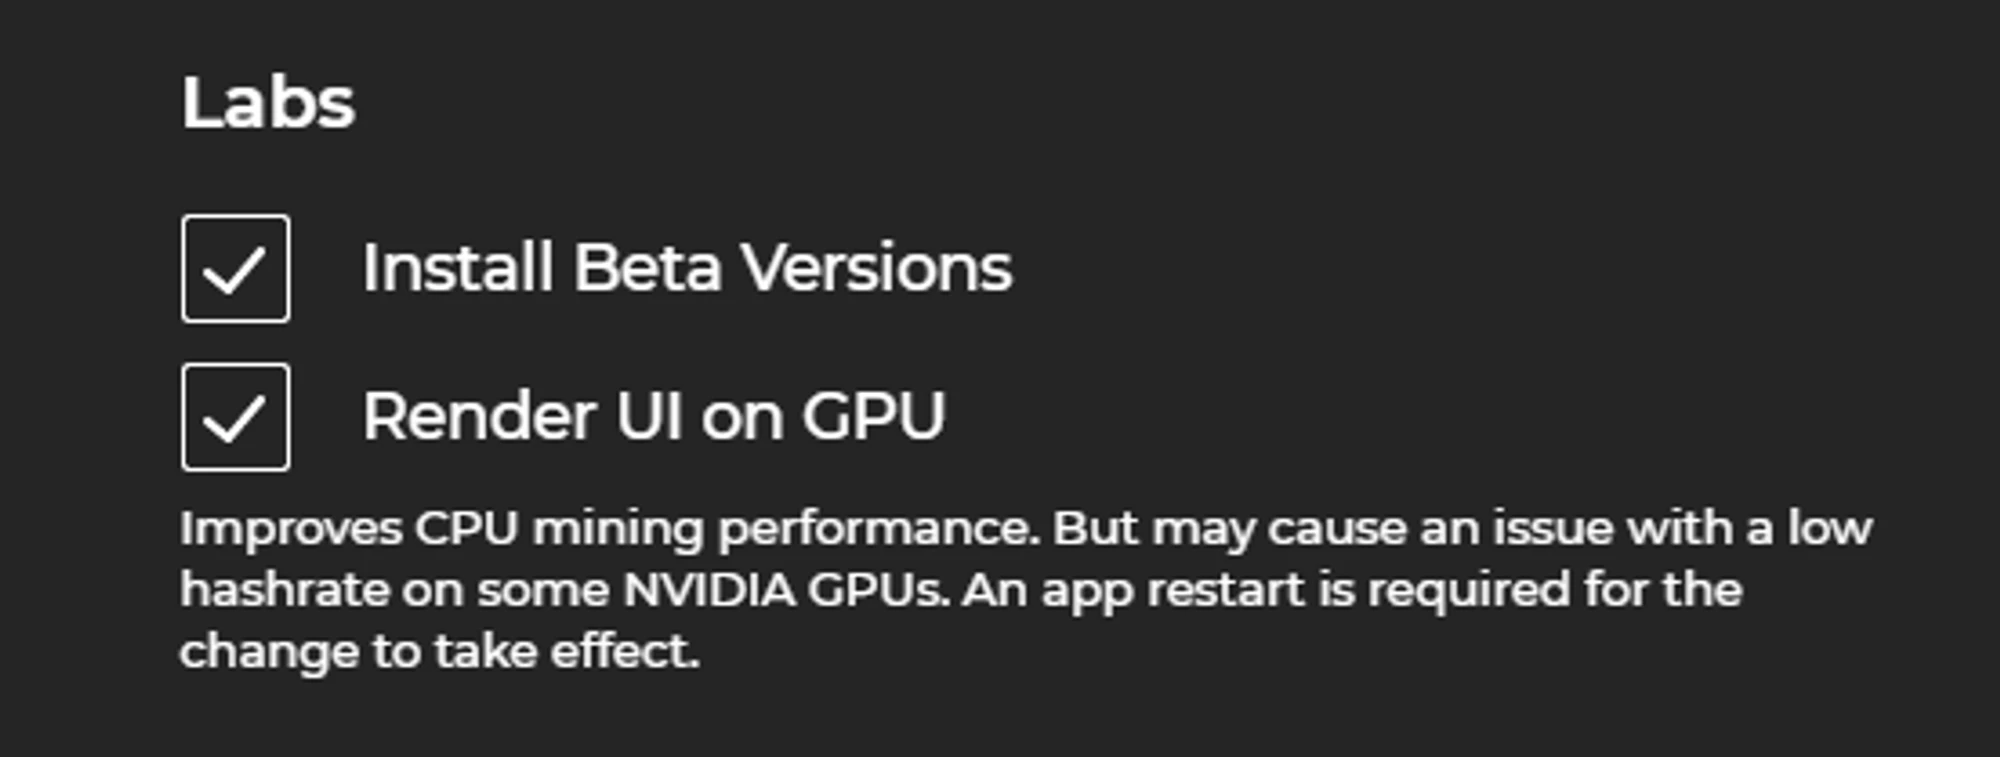
You can also select the rendering preference for the Kryptex application, whether it draws its interface on the processor or the graphics card. This allows you to allocate more resources for either processor or graphics card mining.
- Ensure that you have enabled PRO mode.
- Open Kryptex settings and navigate to the "Account" section.
- Enable the option "Render GUI on GPU" to reduce the processor load.
Restart the Kryptex application.
Basic OS Settings
Enable Huge Pages
If you are mining using the Kryptex application, there's no need to enable HugePages. Kryptex takes care of this automatically!
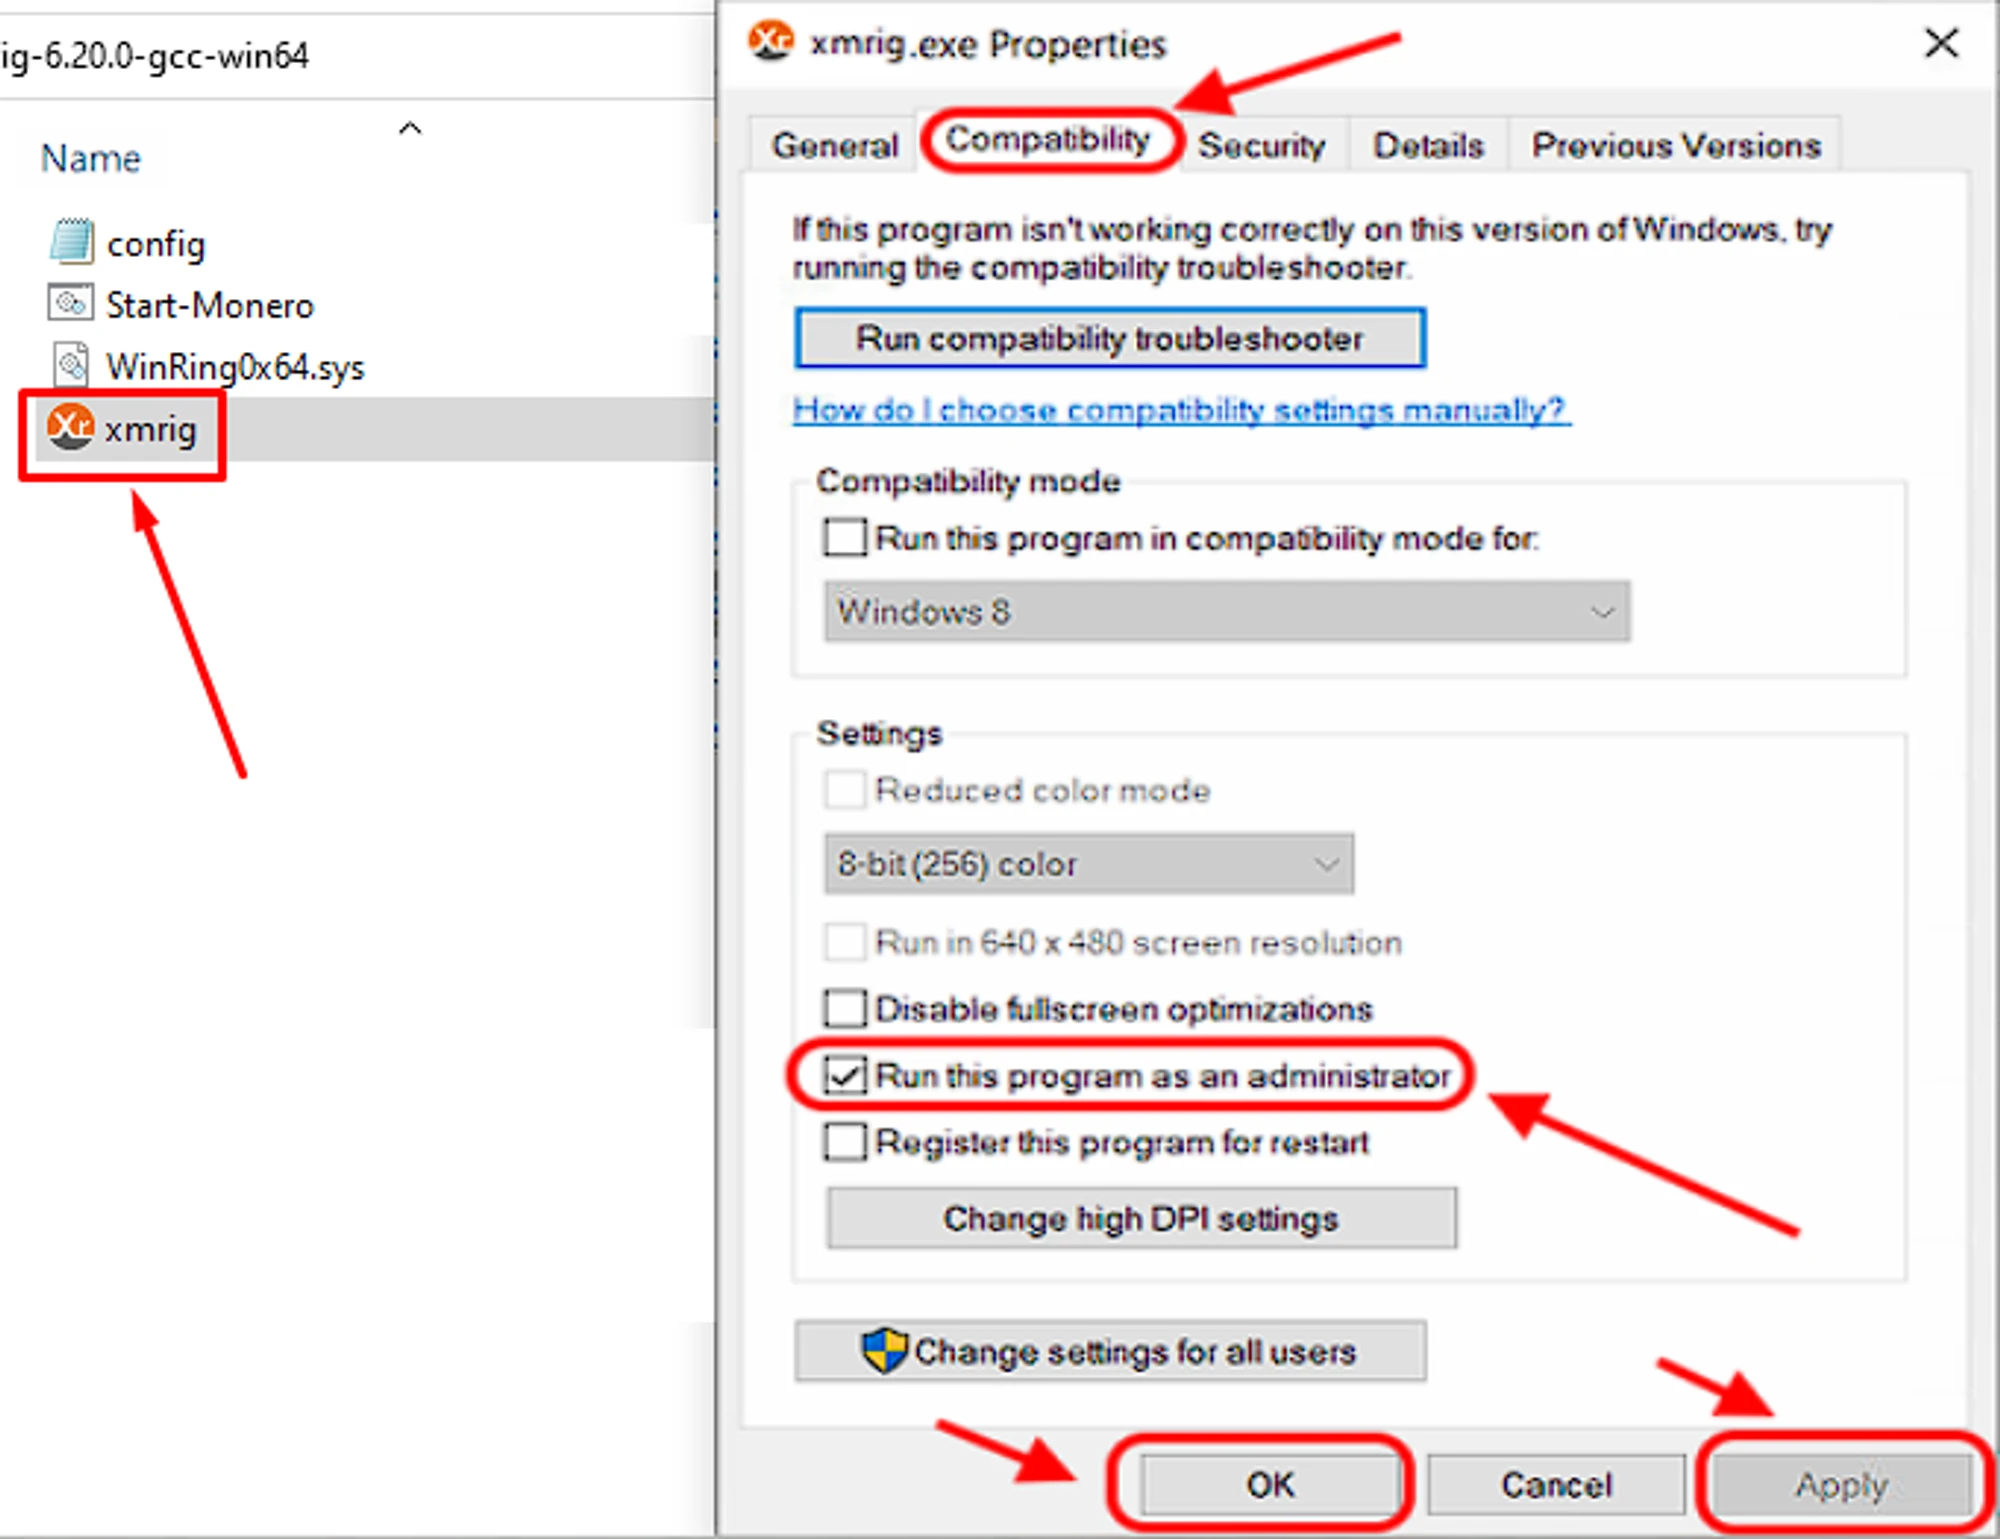
Grant administrator rights to the xmrig.exe miner.
- Right-click on the
xmrig.exeminer and choose “Properties”. - Navigate to the “Compatibility” tab, and enable the “Run as administrator” option.
- Apply the changes.
Start the miner, wait for 5 minutes, and restart your PC to implement the settings.
If this doesn't help, you will need to make changes manually:
- Press
Win+Rkeys. - In the window, type:
gpedit.msc - Expand the "
Computer Configuration→Windows Settings→Security Settings→Local Policies→User Rights Assignment→Lock pages in memory" column.Then click on the "Add User or Group" button and type your Windows username. After that, save the changes and restart your computer.
Find detailed information on Huge Pages and their configuration for various operating systems in the developer documentation at: https://xmrig.com/docs/miner/hugepages
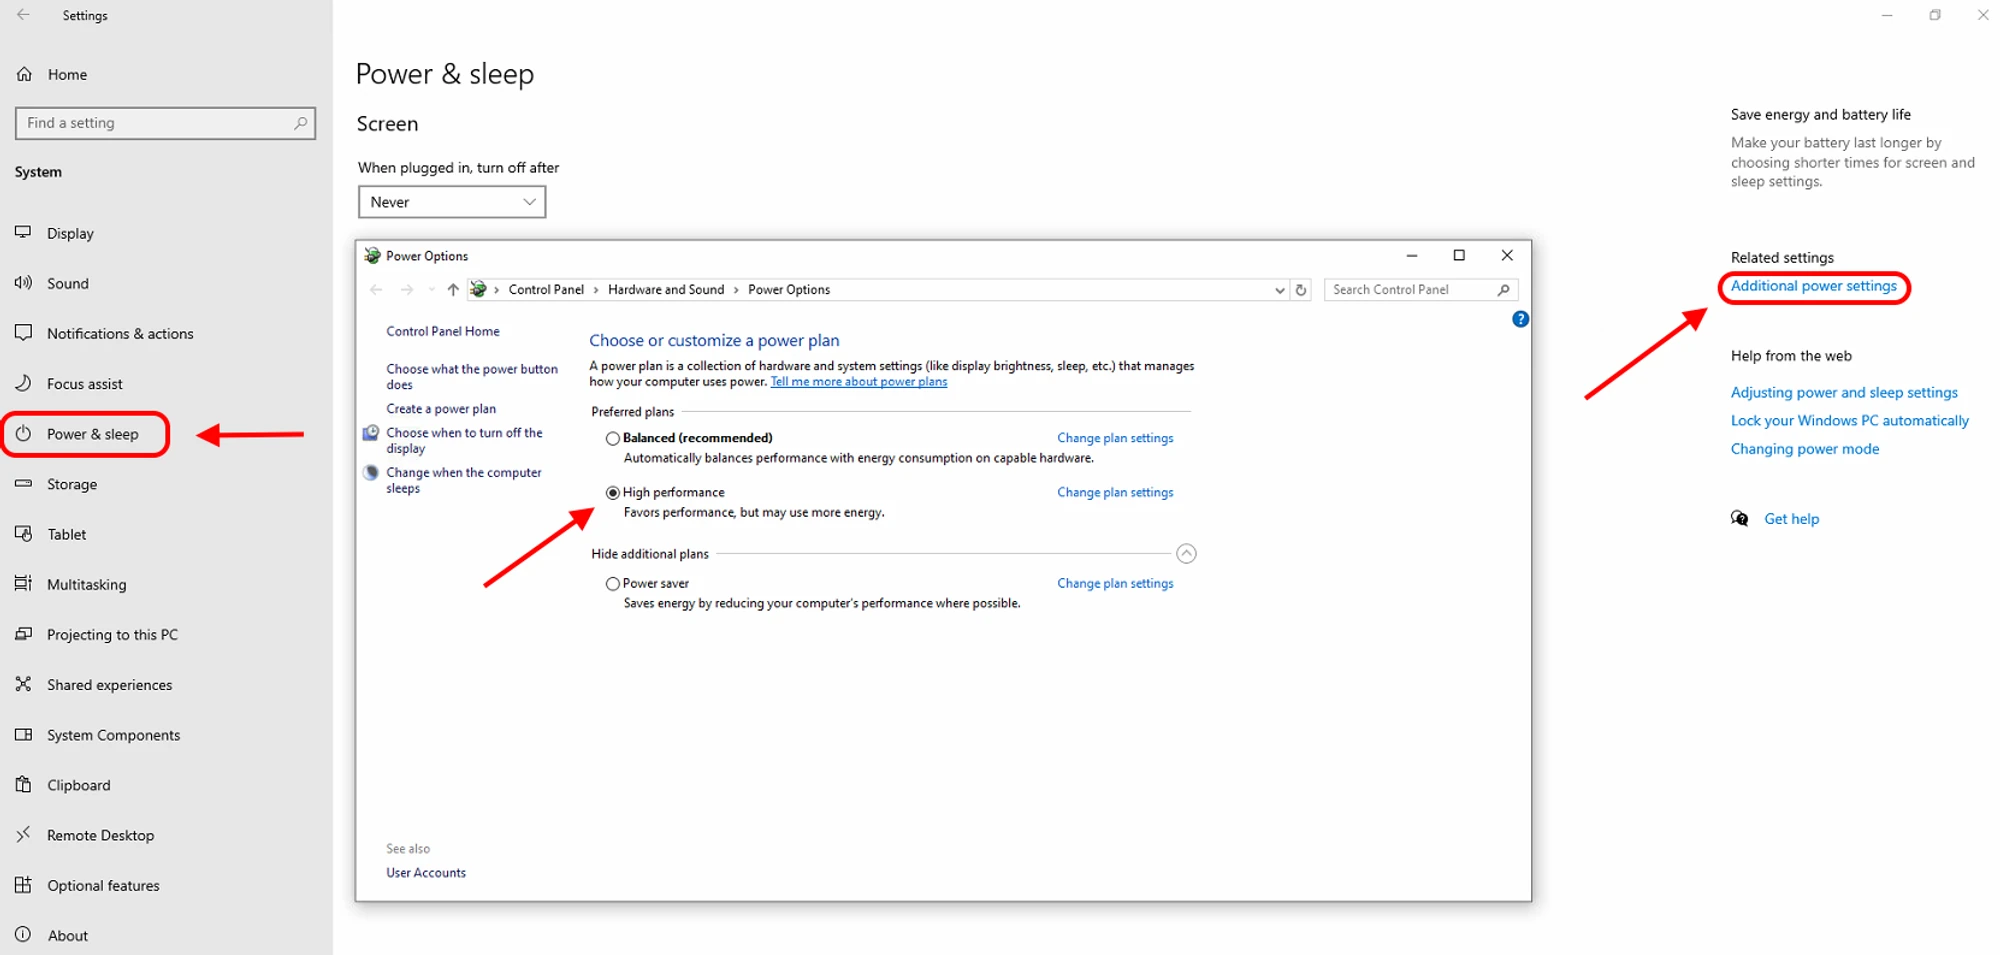
Change Your Power Plan
- Start Menu → Settings → System → Power & Sleep → Additional power settings.
Select “High Performance” mode.
Disable Telemetry
- Download the O&O Shutup 10 and 11 program from: https://www.oo-software.com/en/shutup10
- Apply the default settings already set by the program.
- Save the settings and restart your computer.
Disable Startup Apps
- Press
Ctrl+Shift+Esckeys and go to the Startup tab. - Disable all applications that start with the system. If you mine with the Kryptex app, do not remove it from autorun!
- Download Autoruns from Microsoft: https://docs.microsoft.com/en-us/sysinternals/downloads/autoruns
- Uncheck all items except Microsoft on the "Logon", "Scheduled Tasks", "Services" tabs.
- Restart your computer.
Remove Unused Applications
- Open Settings → Apps → Apps & features.
- Select the applications you want to remove.
- Click on the "Uninstall" button.
Advanced OS Settings
Disable background applications
- Open Settings → Privacy
- Tap “Background Applications”.
Disable the "Allow applications to run in the background" option.

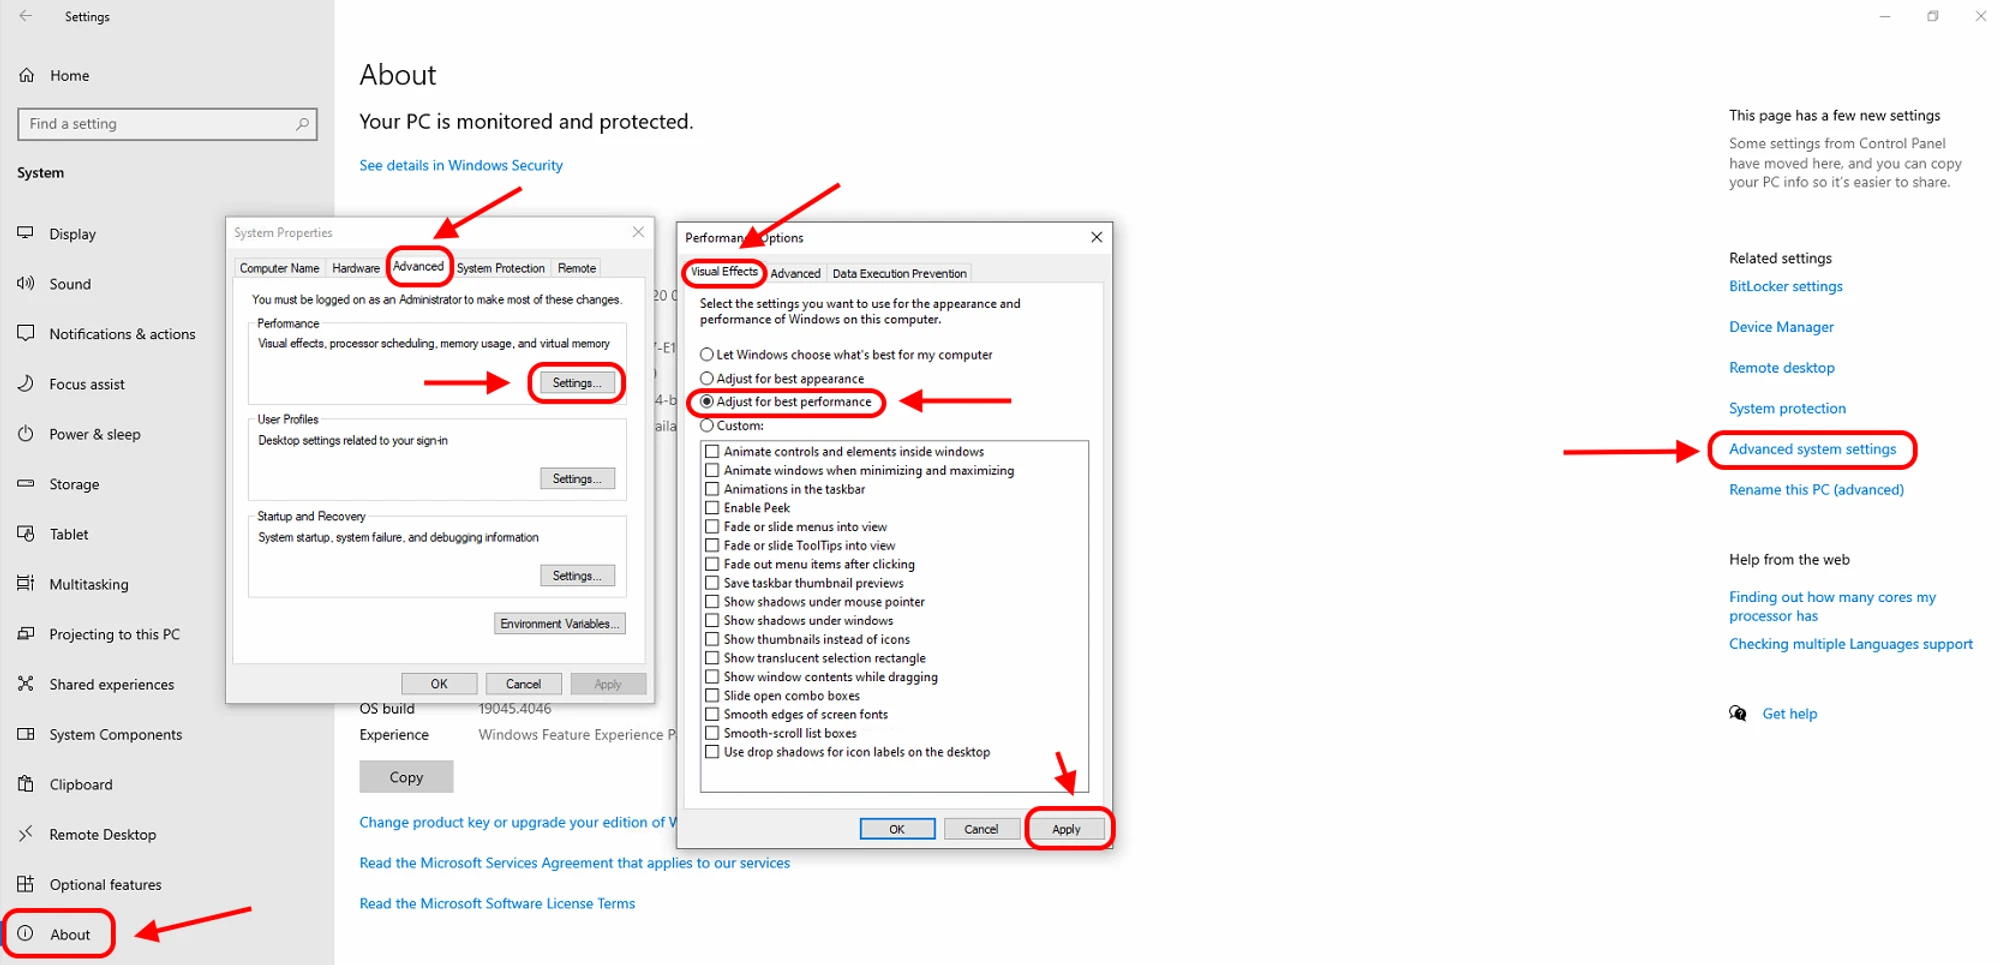
Disable visual effects
Start Menu → Settings → System → About → Advanced system settings → Advanced → Performance → Settings → Adjust for best performance.
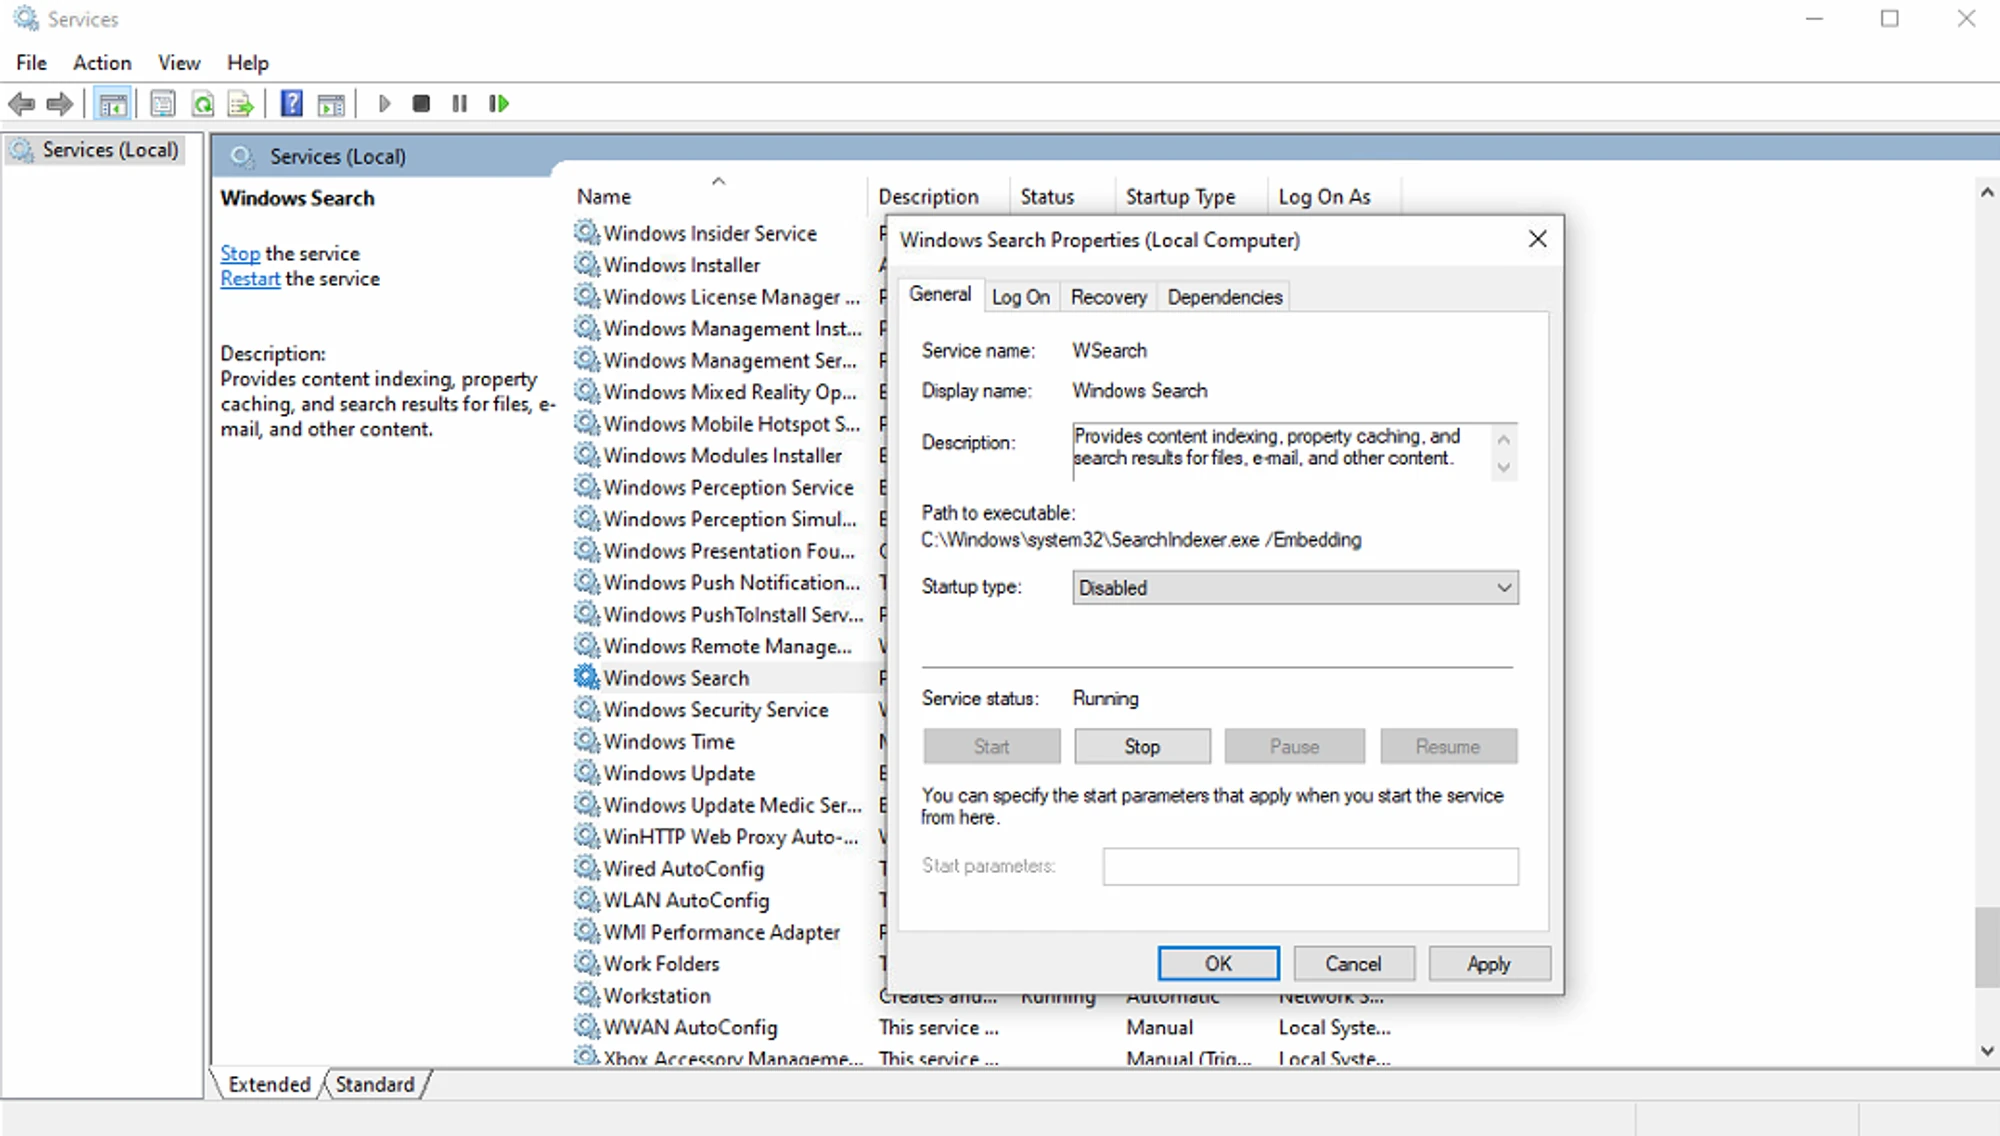
Disable the system service Windows Search
- Press
Win+Rthen typeservices.mscthen press Enter. Find the “Windows Search” service, stop it and disable it.
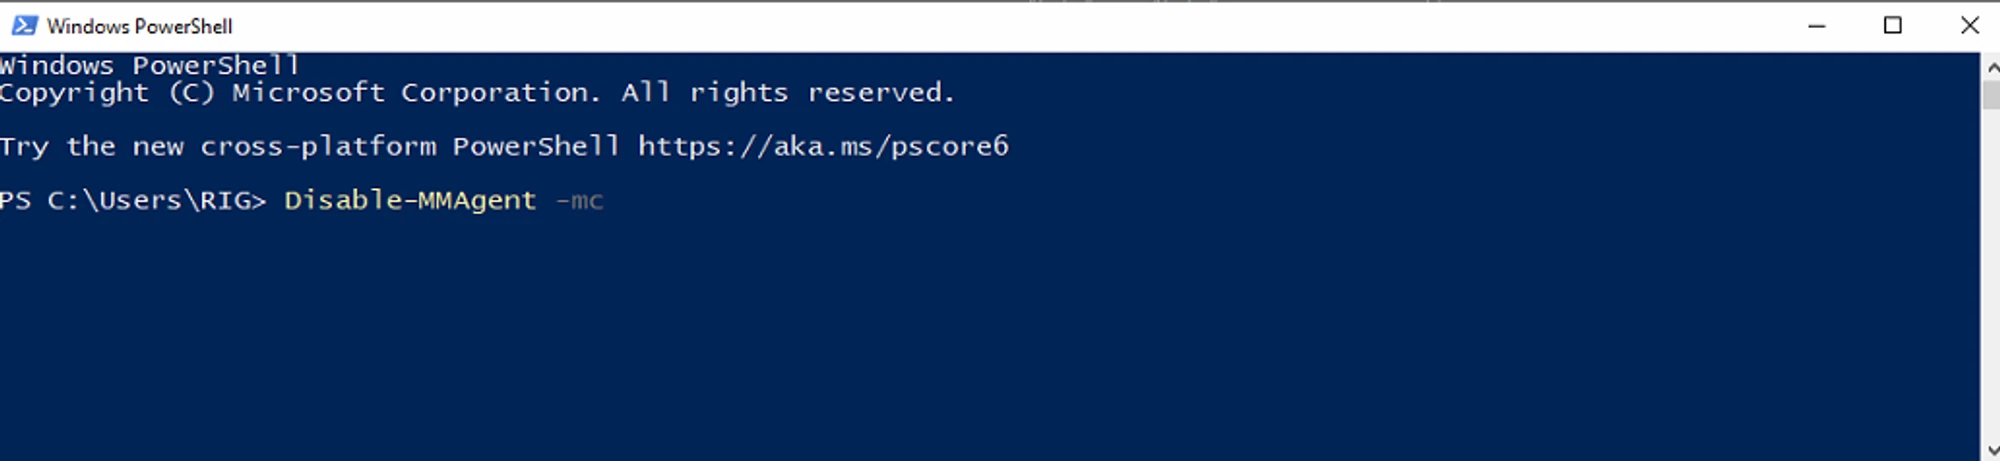
Disable memory compression
- Press
Win+R, then typepowershellthen press Enter. - Type
Disable-MMAgent -mcpress Enter. Restart your computer.
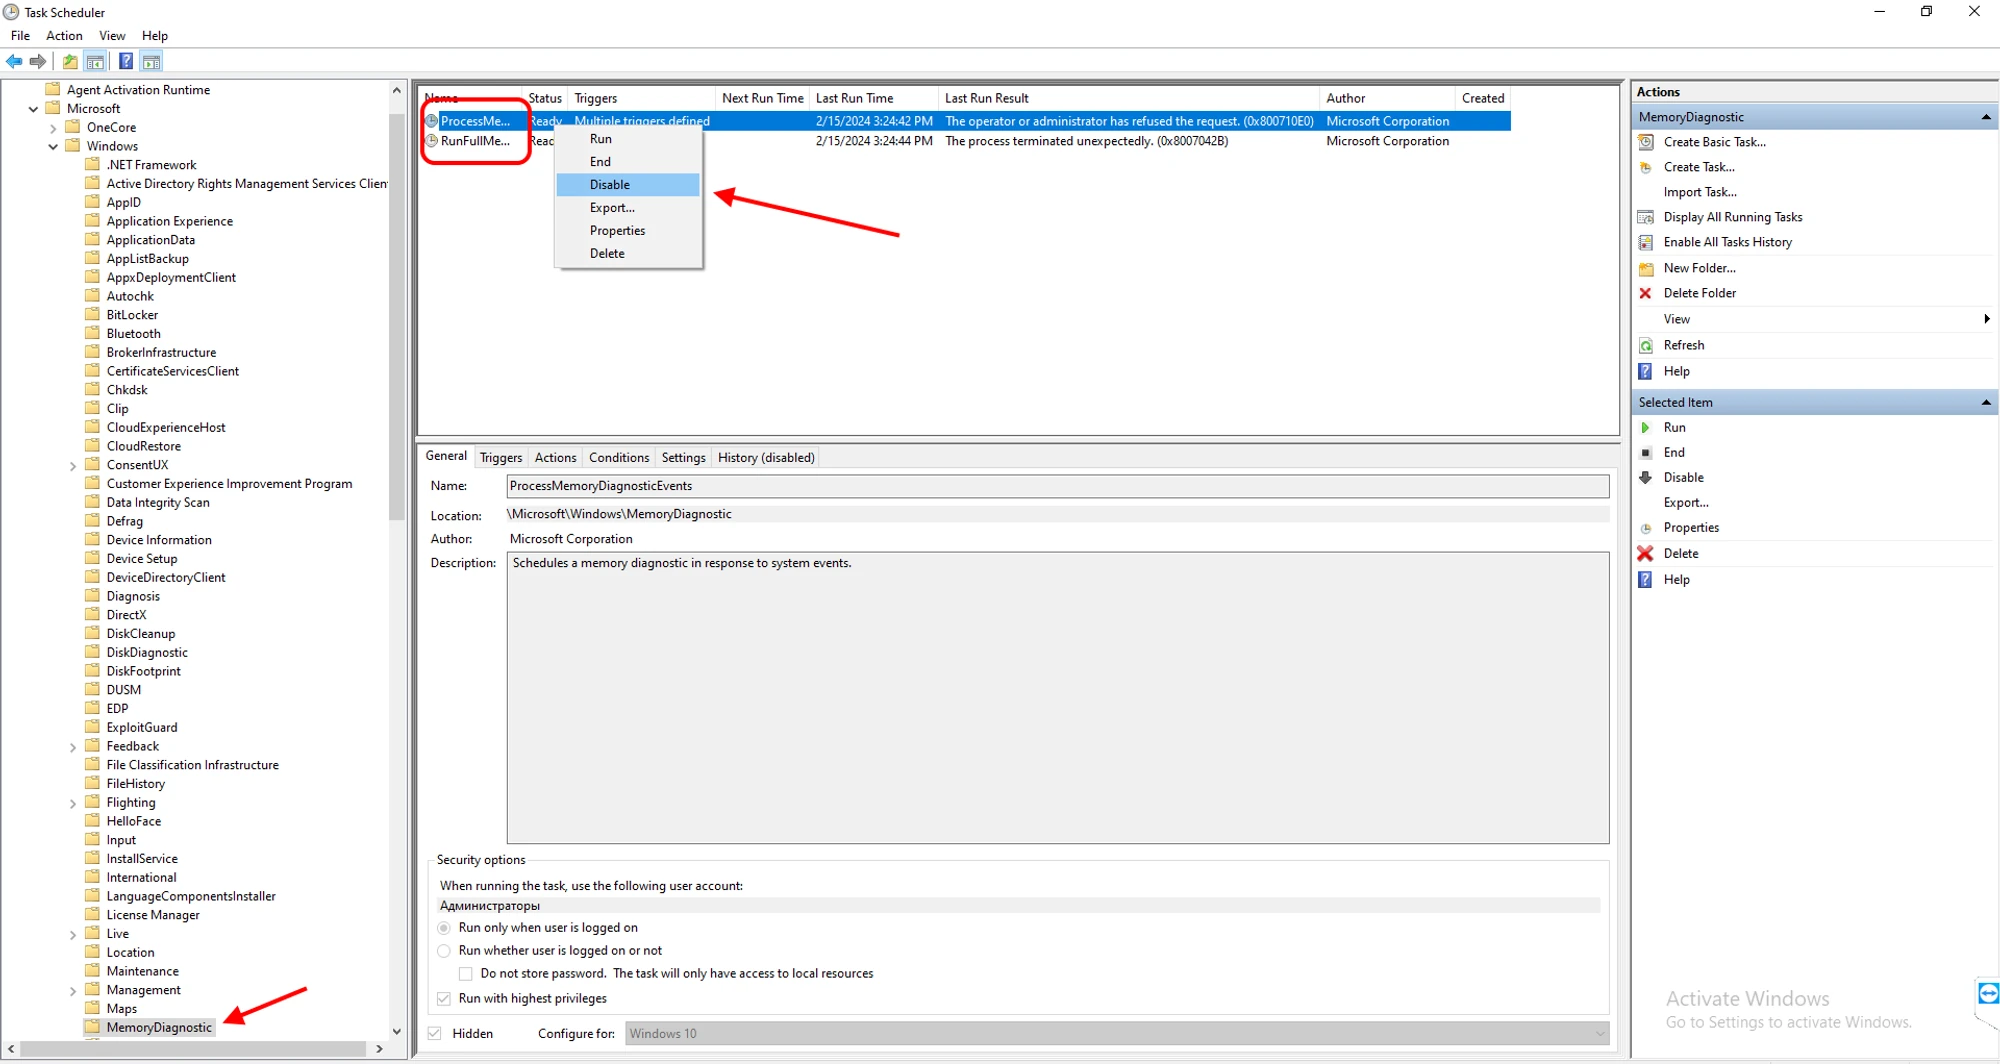
Disable the task RunFullMemoryDiagnostic
This will stop frequent memory checks at startup.
Method 1 — via Task Scheduler:
- Press
Win+Rthen typetaskschd.mscthen press Enter - Open Task Scheduler Library → Microsoft → Windows → MemoryDiagnostic in Task Scheduler.
Disable all tasks there.
Method 2 — via PowerShell command prompt as administrator:
schtasks /Change /TN "\Microsoft\Windows\MemoryDiagnostic\RunFullMemoryDiagnostic" /Disable
Method 3 — via registry in PowerShell command prompt as administrator:
reg add "HKEY_LOCAL_MACHINE\SOFTWARE\Microsoft\Windows NT\CurrentVersion\Schedule\TaskCache\Tree\Microsoft\Windows\MemoryDiagnostic\RunFullMemoryDiagnostic" /v "Index" /t REG_DWORD /d 0 /f
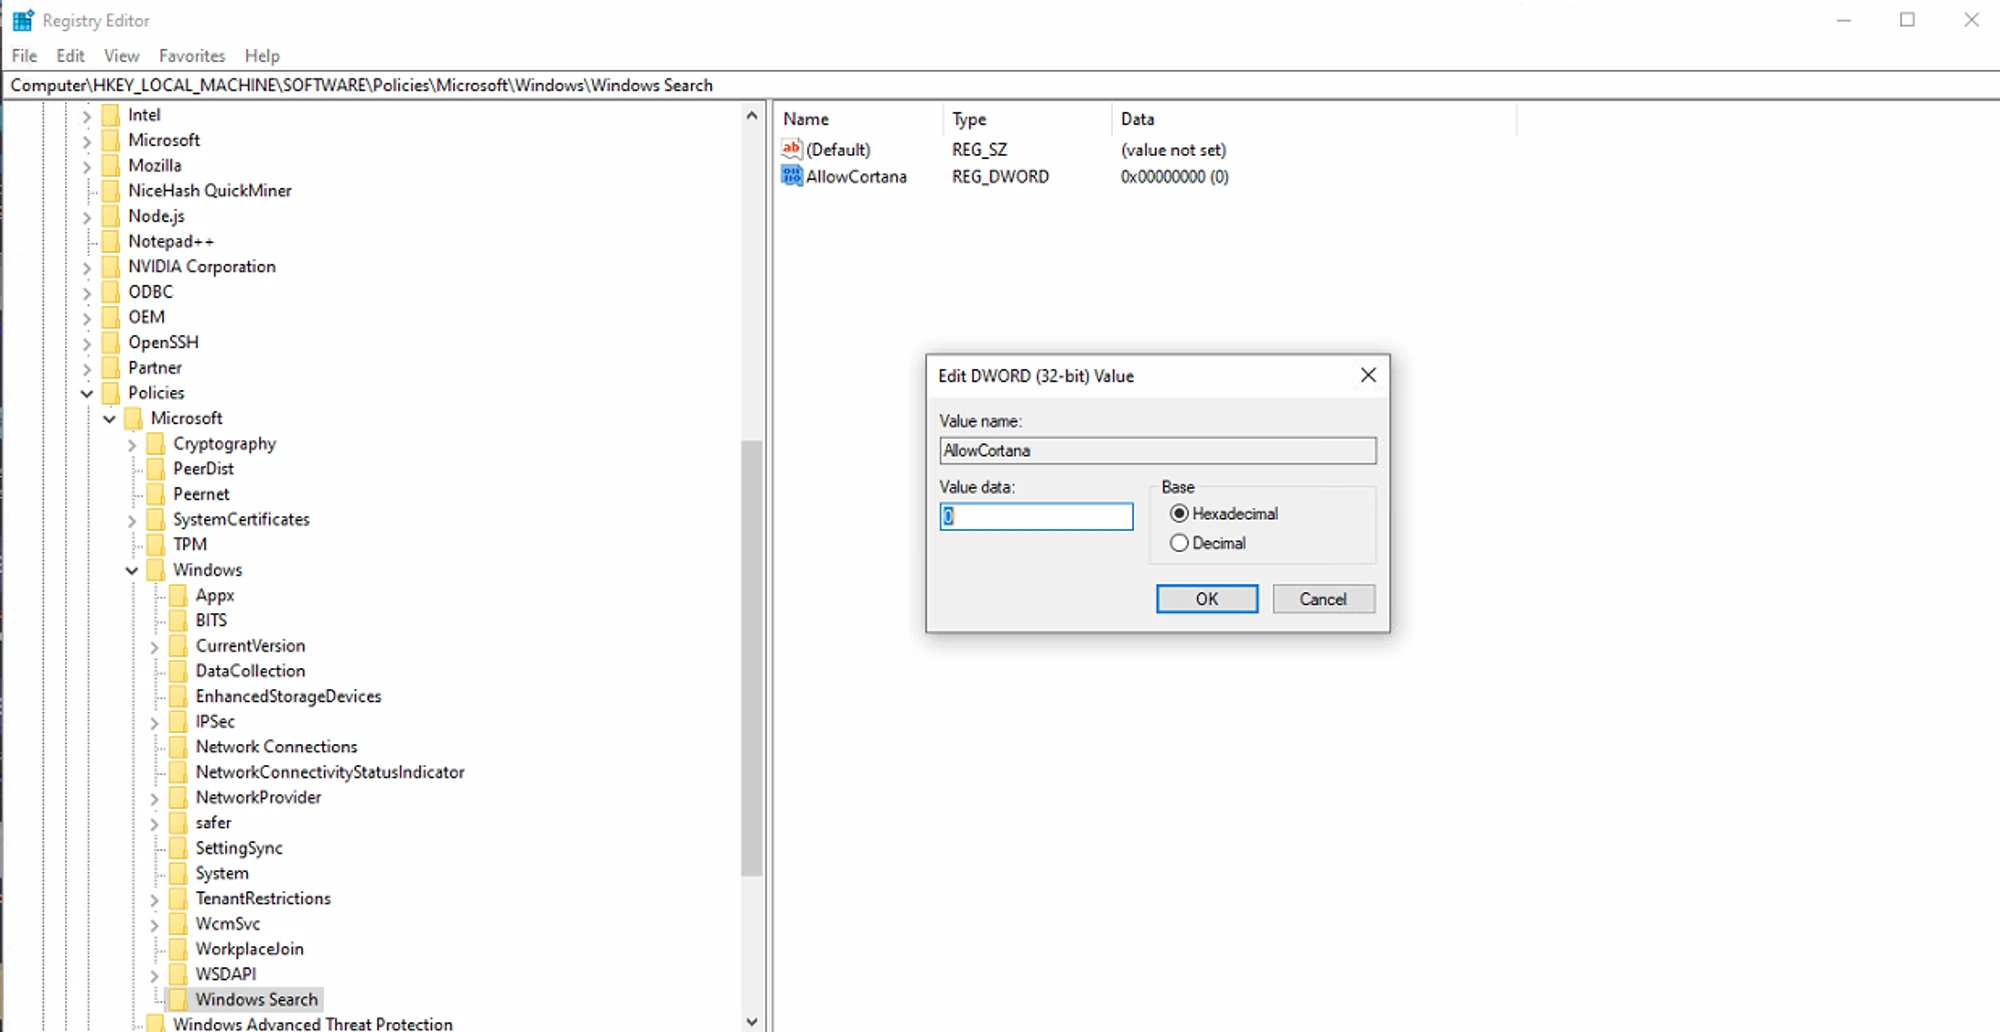
Disable Cortana
- Press
Win+Rthen typeregeditthen press Enter. - Go to
HKEY_LOCAL_MACHINE\SOFTWARE\Policies\Microsoft\Windows\Windows Search - If you don't see the "Windows Search" key (folder) under the Windows folder, right-click on the Windows folder and select New → Key. Call it
Windows Search - Right-click on
Windows Searchand select New → DWORD (32-bit) Value. - Name the value
AllowCortana. Double click it and set the value to0. Restart your computer.
Need Help?
Have any questions, something is unclear, or you can't connect?
Contact support — we're happy to assist!
- Support Ticket.
- Telegram Support.
- Discord Support.
- Email support at support@kryptex.com.
