


How to build a mining rig
There comes a moment in every miner's life when he outgrows one video card and builds a powerful mining farm.
And we're happy that this farm is mining with Kryptex 🖤
We'll help you choose the hardware, assemble your mining rig and troubleshoot if you have any.
1. Let's choose the hardware
Look before you leap!
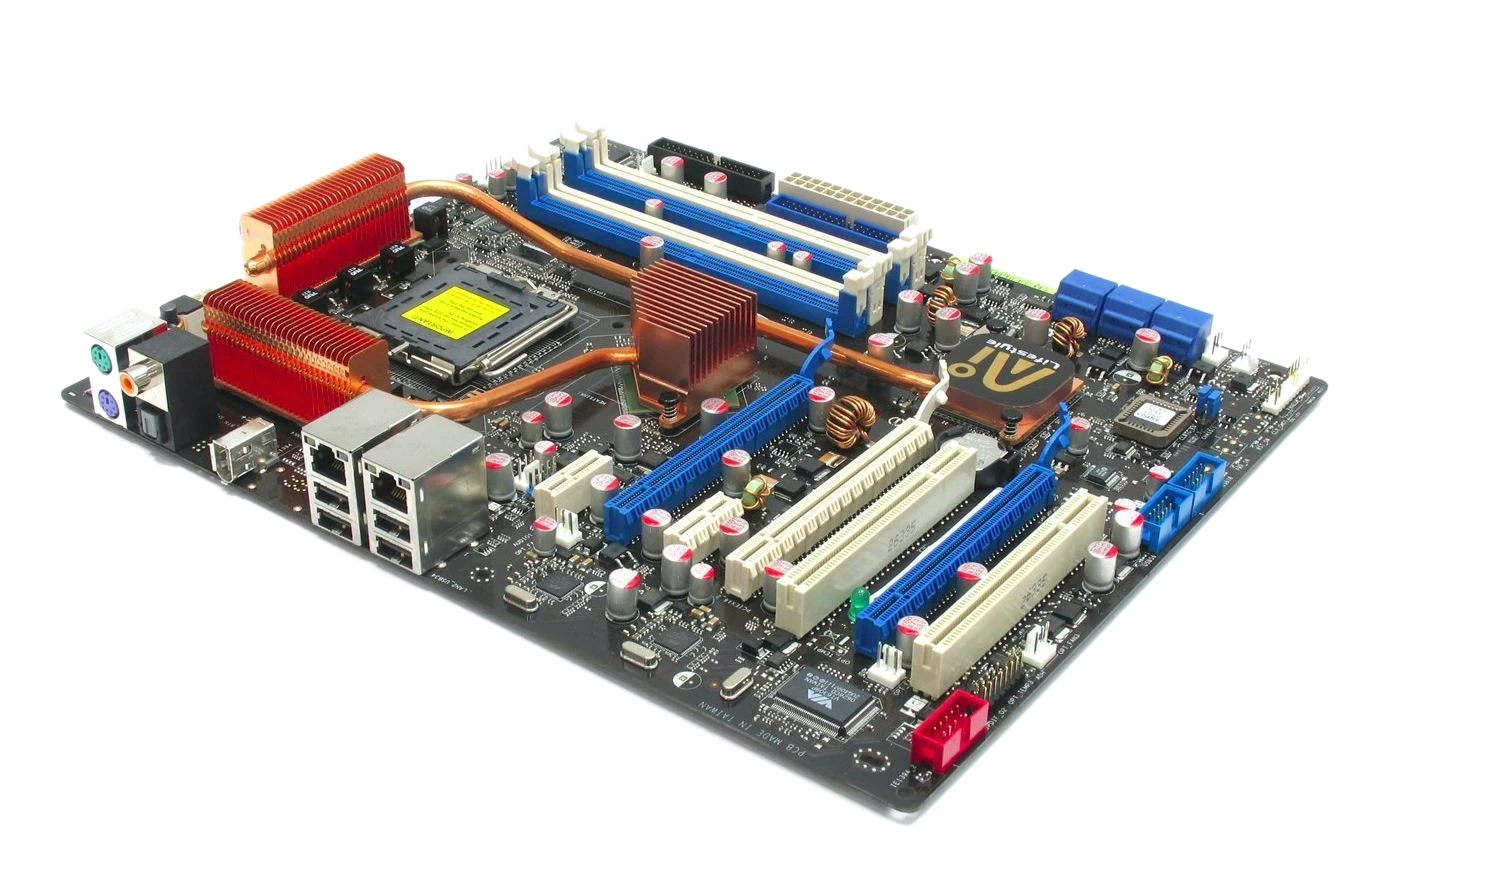
Motherboard
The motherboard is the main part of your farm. Before choosing a motherboard, consider how many graphics cards you want to connect. The more graphics cards you want to connect, the more PCI Express (PCI-E) connectors you need.
We will tell how to choose a motherboard for a mining rig in our article.
There are so many motherboards and modifications that you can get confused! Which one to choose? Any of them will be suitable for mining!
If you want to build a powerful farm with six or more video cards — we advise you to look at special models designed for mining. For example, GIGABYTE GA-H110-D3A, or MSI H310-F PRO
Have you got an old motherboard ASUS P5N32-E SLI (Plus) with an Intel Core Duo E8400 from 2016 somewhere at your warehouse?
Even a motherboard like this would be suitable for a farm and could take up to 4 video cards! If you have something like that, you already have a platform for a farm, isn't that great!
Nevertheless, we recommend choosing a newer motherboard for your peace of mind. No one can guarantee that old components will last another 16 years. Mental health and free time are worth more than a few dollars spent on new hardware.
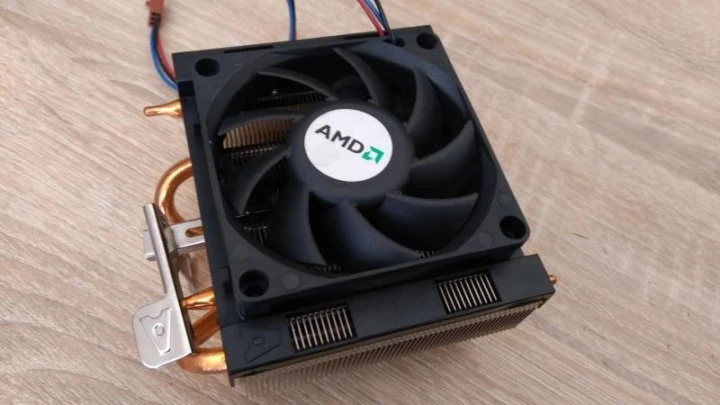
🗿 The Processor (CPU)
How important is the power of the processor? Cores, threads, frequency, all that stuff?
If you are NOT going to mine using a processor, its performance doesn't matter.
If the processor is NOT involved in mining, running the OS and background processes will be the only task. So even an old Intel Core Duo E8400 is enough.
How to choose a CPU for your mining rig — read in our article.
Take a close look at the compatibility of the sockets of processors and motherboards.
The LGA 1151 processor will fit the LGA 1151-v2 socket, but it will not work, and even a BIOS upgrade will not help you.
☝ Check the compatibility of your CPU and motherboard!
☝ LGA 1151 and LGA 1151-v2 are completely different sockets
Consider how many PCI-E lanes you need for your farm. The more PCI-E lanes your processor supports, the better!
Does your processor have an integrated graphics core AMD Vega or Intel Graphics?
You may have to disable it if your farm can't identify the graphics card or if the computer works unstable.
🔌Mining rig's power supplying
Let's check if your Power Supply Unit's (PSU) power is enough for your mining rig. It's better to spare a few hundred watts than worry about the rig's shutting down at the slightest load surge.
- Capacity. Calculate the total power consumption of all of your graphics cards and +200 watts of spare capacity.
- The number of connectors. Choose the PSU models with the most 6-pin and 8-pin connectors so you can connect all your graphics cards and raisers without any adapters.
- Certificate = Efficiency. Won't affect the quality of your PSU components, but it will save you money on your electric bill.
Connections and adapters
We chose a power supply unit with extra capacity, but it doesn't have all the connectors you need for your video cards or risers! Unfortunately, we forgot to calculate enough slots to power the video card or the raiser in our excitement. A familiar problem, every miner faces it sooner or later.
All adapters are wicked, but there are some exclusions.
Don't tear the hair on your head or calculate the loss of buying a new power unit! Instead, let's take a look. You can probably deal with the problem using a splitter. How to choose a splitter without burning everything around — Fyodor describes it for you.
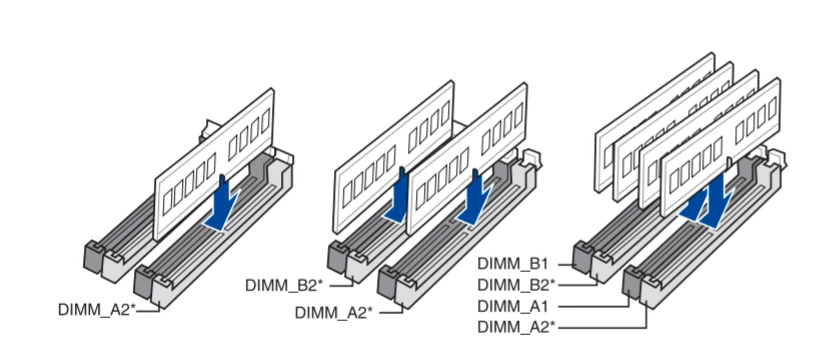
RAM
You assembled all the parts of the rig and are ready to go. Slow down and take a look at your rig. Have you connected everything correctly? For example, an improperly inserted RAM bar can prevent the farm from starting and reduce the hashrate on the CPU while mining.
Open your motherboard’s user manual, and look in which slot it is better to install the RAM bar if it is one, or how to install them if there are two.
What kind of RAM to choose for mining — telling in our article.
Cooling Fans
☝ A cooling fan is a good thing. A correctly installed cooling fan is even better!
The more cooling fans, the better? Of course! But it's not just about the number and power that are important. It's also about the position how you install them. A fan can draw in cool air from the outside and blow out hot air away from the components. Make sure that the air circulates properly through the case and dissipates heat where it is needed.
Storage
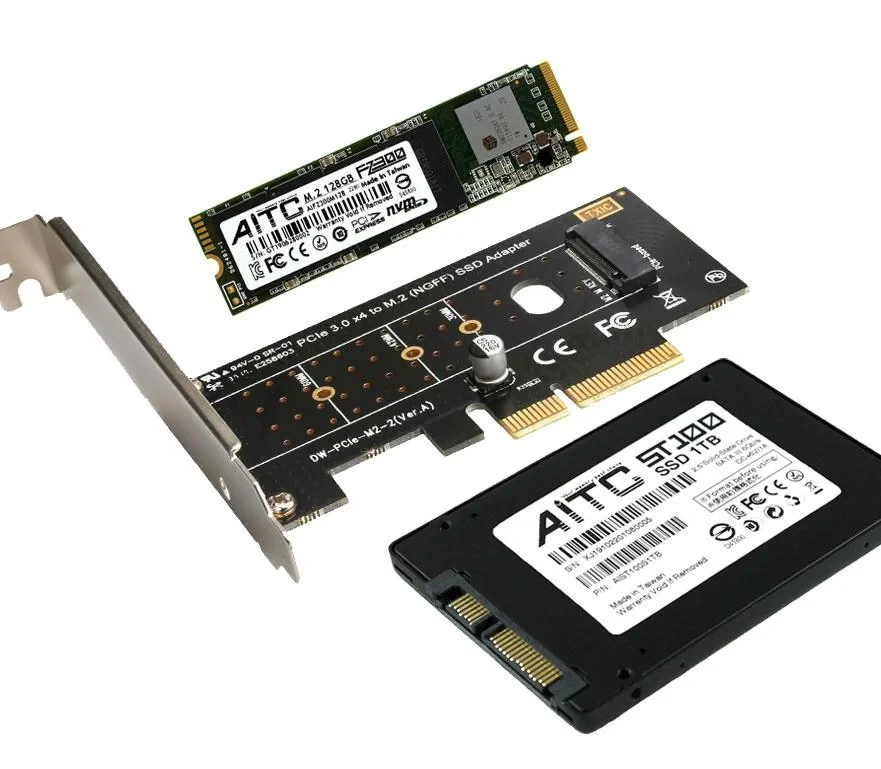
Have you decided where you're going to install the OS? The hard drive, 2.5" SSD, NVME, maybe even PCI-E?
Each type of storage has its pros and cons. We recommend you 2.5" SSD, and here's why:
- Speed. Using an SSD, your farm will start up fast, and you won't waste time waiting for your operating system to boot up.
- The lifespan of modern SSDs is high enough to handle the workload of a farm.
- Price no longer hits your wallet ~$30 for 250GB — with plenty of space to spare for the farm!
- It doesn't take up precious PCI-E lines.
When choosing NVME and PCI-E drives, remember that they take up PCI-E lines, which will be needed to connect video cards.
Make sure that your motherboard and processor support enough PCI-E lines. NVME connector often combined with a PCI-E connector — you'll have to choose one or the other. A graphics card and the NVME storage may not work simultaneously.
Risers
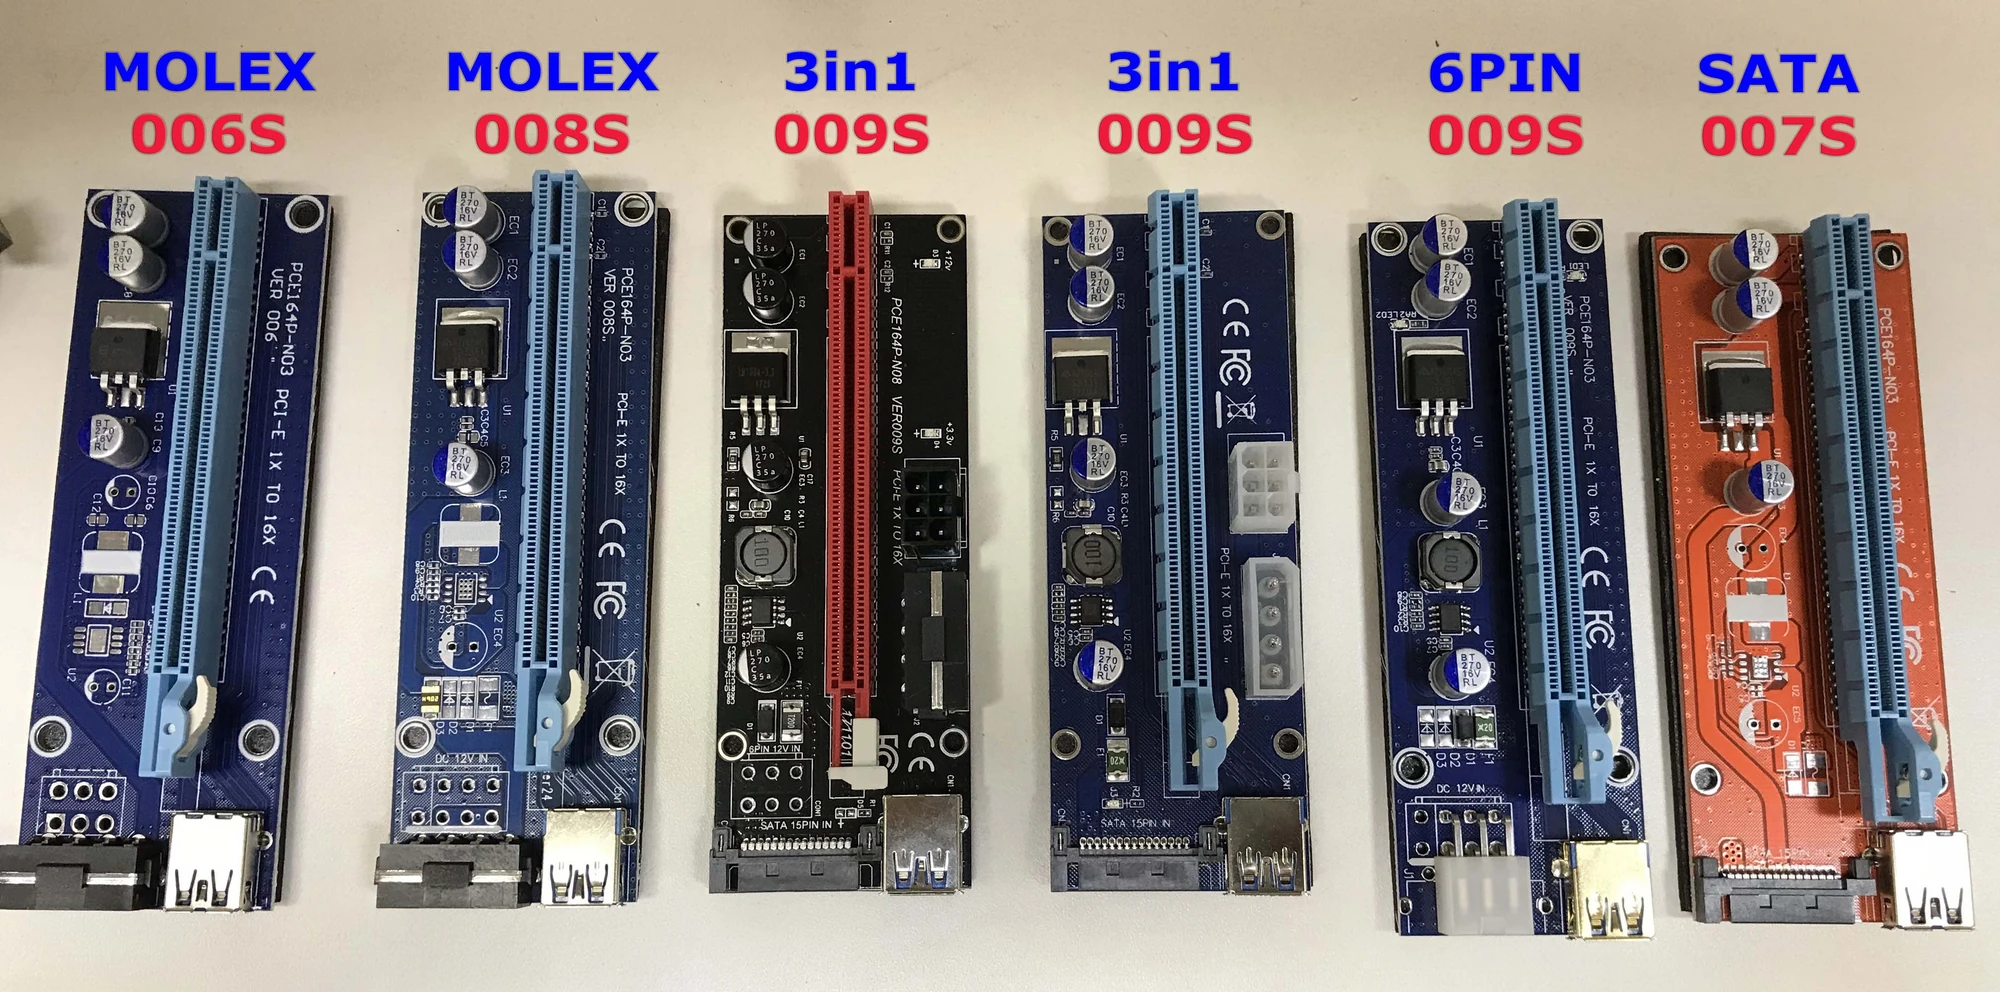
The more GPUs — the better! But how to connect them if you don't have enough PCI-E x16 slots? Using a riser, of course.
Please don't skimp on the riser because it has the heavy responsibility of serving as a bridge between your graphics card and your motherboard, as well as powering your graphics card up to 75 Watts.
How to choose the correct Riser.
🩺Diagnostics
Everything is ready! You rub your hands together, turn on the power supply, start the mining rig, and it's turned off... What's wrong?!
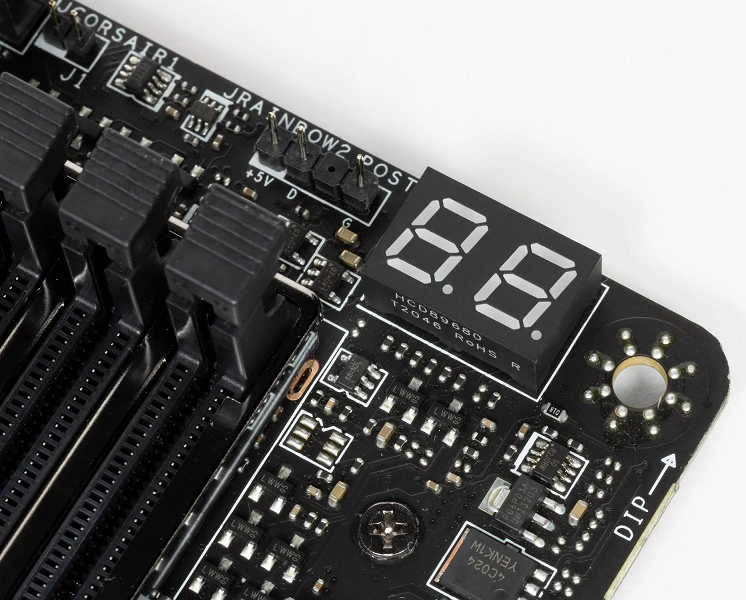
Every motherboard does a self-test during startup - BIOS POST (Power-on self-test)
If there is an error, the computer will not start. Each error has its code, by which you can identify the problem.
The codes are supplied in several ways:
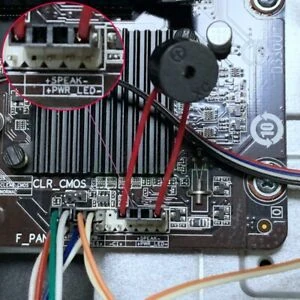
Motherboard’s self-diagnostic interface. If the motherboard is new, most likely it has complete or partial diagnostic tools. Color LEDs, or a numeric display to show the error code.
Speaker (aka Buzzer) Not to be confused with loud speakers! It must be plugged into a special motherboard socket.
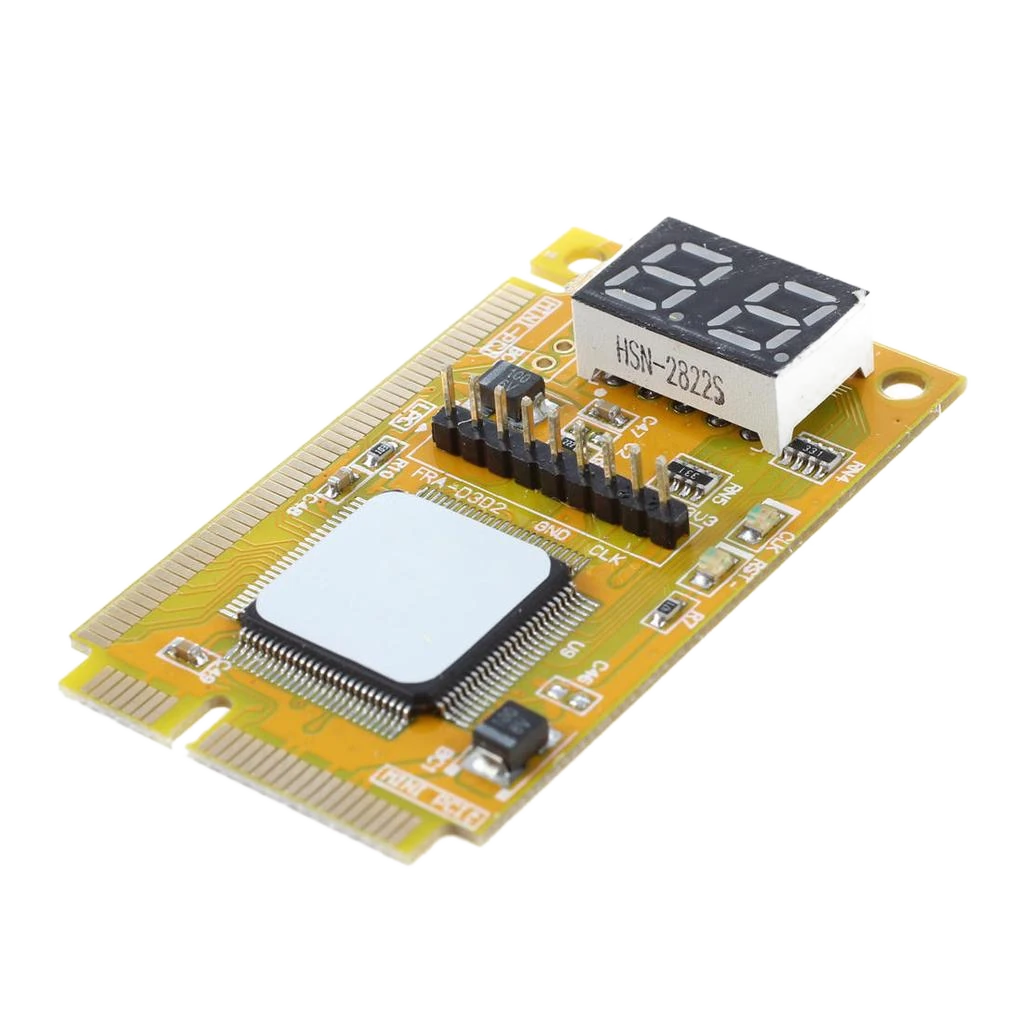
Slightly outdated but still functional, BIOS diagnostic POST cards.
🎛 BIOS Setup
Usually, configuring the BIOS is not difficult when your computer has a minimum of components. But when you connect several video cards, you start dancing with tambourines:
- In Task Manager, you don't see the card.
- The driver can't be installed.
- The card disappears and refuses to work at all.
Before you connect multiple video cards, it is critically important to configure your motherboard’s BIOS correctly.
- Update your motherboard’s BIOS — outdated BIOS may hide important settings.
- Enable Above 4G Decoding.
- Reduce the PCI-E speed to Gen2 or Gen1.
- Disable the integrated GPU if the system is unstable or there are not enough PCI-E lanes.
- Turn on the Resizable Bar (Dynamic Bar) option, if available.
- Disable CSM mode.
- Unload the first SATA ports on your motherboard. Connect an SSD or hard disk drive with SATA 4,5,6 connectors...
For more details, read our article "How to set up a BIOS for mining.”
Don't hurry to close the BIOS settings. Enable the auto-start function after power loss! Every motherboard has such option, and it will save you time.
Enable option: Restore AC on power loss
Most manufacturers of mining motherboards include a manual with the correct settings for mining. Check the manual for the optimal settings for mining.
Some manufacturers decide to make a separate online manual. For example, Gigabyte
2. Windows installation and setup
Kryptex recommends using a licensed, clean version of Windows 10 x64 Pro Download it from the official Microsoft website, it’s completely free of charge. Moreover, you don't need to activate it if you only use your computer as a mining farm. It won't affect performance, and it’s legal.
Paging file
After installing Windows, the first thing to do is expose the paging file.
If the miner does not have enough swap file size, it will be unstable or will not start.
**We will tell you how to do it and how much to set it.**
Power settings
Disable your PC's sleep and hibernation modes.
They will only get in the way of the mining rig.
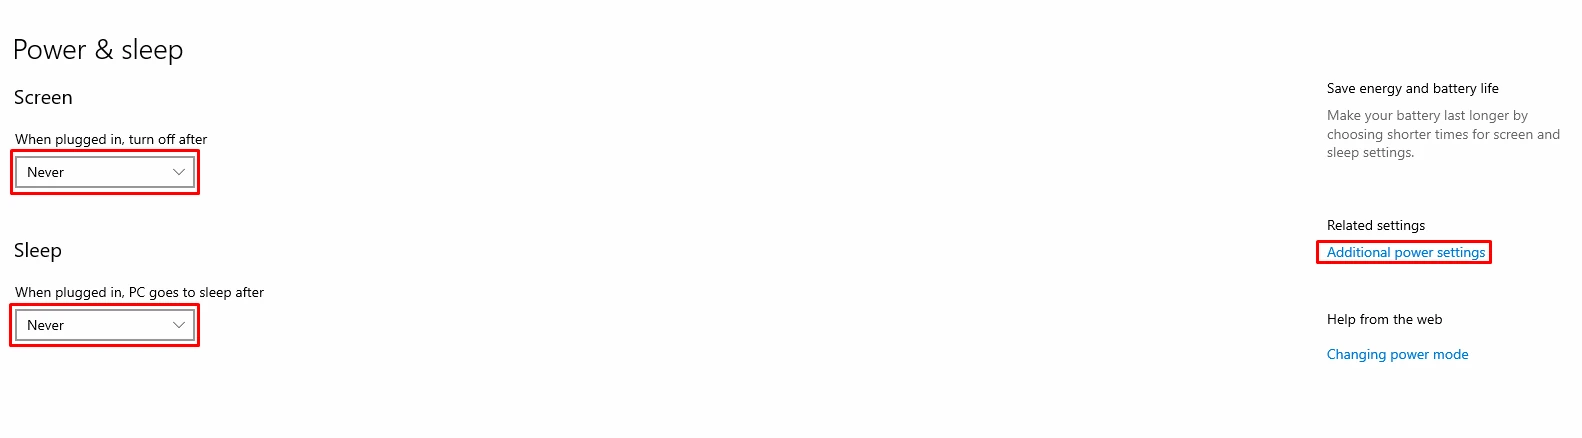
Go to “Start” Menu → Settings → System → Power & Sleep
Set all settings to "Never." Don't hurry to close it — let's keep on tuning.
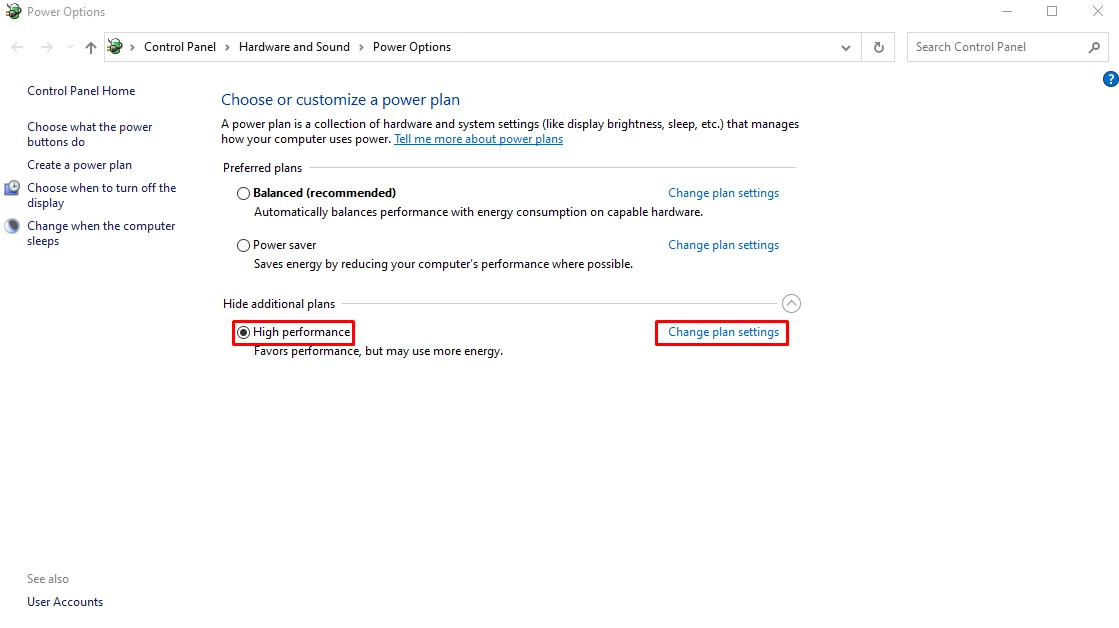
Set your computer's power profile to maximum performance.
Click "Additional power settings" on the right side.
Open the advanced options, click Hide additional plans and choose High Performance.
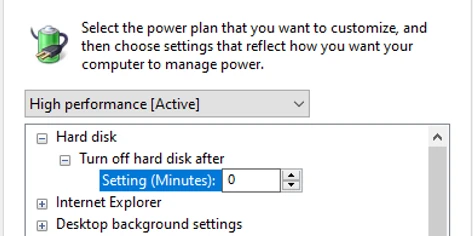
Disable the hard disk turn off.
On the selected power profile, click "Power Scheme Settings” Next, click on "Change Advanced Settings”
Find "Hard Disk" → "Turn off hard disk after" → set to "0" — “Never”
Turn off option that Suspends the USB ports for power saving.
Find "USB Options" → "USB Suspend Settings" → set to "Disabled.”
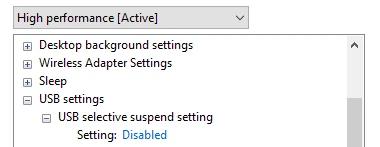
Apply, and save these settings.
If you use Wi-Fi for the Internet connection — prohibit disabling it for power saving!
Open "Device Manager" → Find "Network adapters" in the device list → Select your Wi-Fi module in the list → Go to the "Power management" tab → Uncheck "Allow device disconnection...." Click "OK" to save your settings.
3. Install Kryptex!
Download the latest version of Kryptex; install, authorize, run the benchmark (if necessary), and start making money!
Any problems? We'll tell you more in our article "How to start mining with Kryptex!".
Don't forget that any antiviruses react aggressively to any mining software.
You don't need to disable them, just disable PUA
Did antivirus manage to corrupt the Kryptex files?
Let's try to reinstall Kryptex completely. In addition to the program itself, you will also need to remove these two folders:
C:\Users\<username>\AppData\Local\Programs\kryptex-app
C:\Users\<username>\AppData\Roaming\Kryptex
Or use a proven uninstaller: https://geekuninstaller.com/. Then install Kryptex as usual. Download the original installer only from our website: https://www.kryptex.com/download
4. Helpful hints
- If you have Nvidia and AMD video cards installed in the same rig simultaneously, follow the order of drivers installation. Firstly, install the Nvidia, then the AMD. If it is vice versa - AMD cards may not be detected!
- Don't rush to install the latest drivers! Drivers should be up to date, but not necessarily the latest. So make sure the driver version you are going to install is stable! Taking lessons from mistakes https://www.kryptex.com/en/news/nvidia-496-en
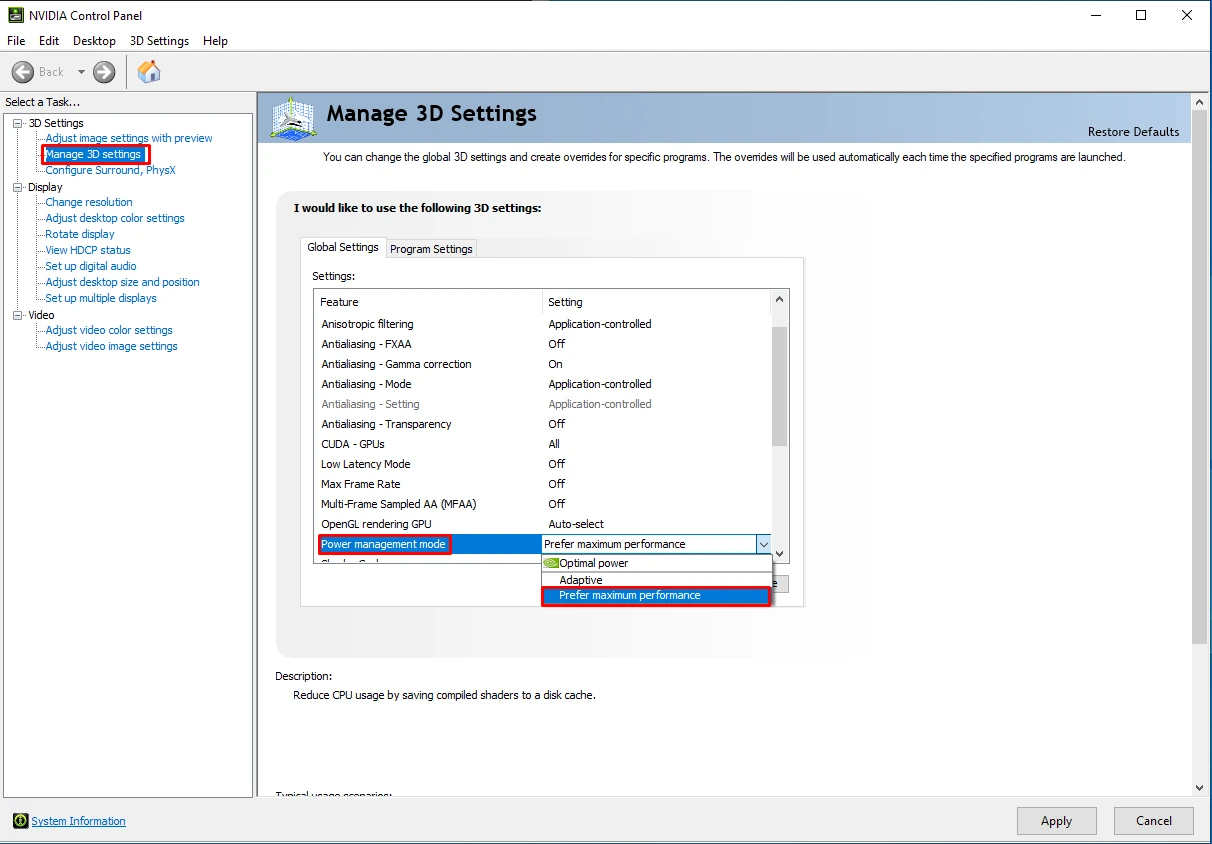
Are you using Nvidia drivers? Turn on "Maximum Performance" in the 3D settings in the Nvidia control panel.
You have GTX 1080, 1080Ti, Titan XP graphics card? ETHlargementPill can boost your hashrate!
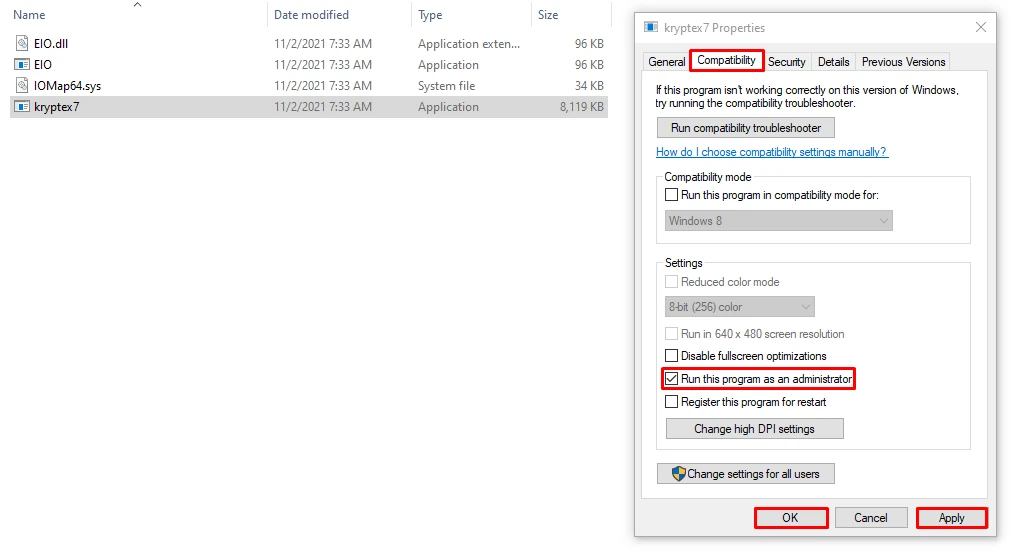
Hashrate drops, and the Pills with arguments don't help? Make sure the miner is running with the administrator rights!
AMD RX 400/500 series cards? Enable compute mode.
- **Don't overclock the cards as much as possible.** Watch the stability of the mining rig for at least 24 hours, only then step by step overclock your video cards.
- Use wired Internet. It will increase stability, speed up access to the pools, protect against radio interference, and increase your income!
- Mining rig with a Steel frame? Ground the farm! A large amount of electronic components generate static and electromagnetic fields. The powerful appliance needs to be grounded!
- Use a wattmeter or a smart plug. Monitor the consumption and control power remotely.
- More useful tips for stable mining
5. HiveOS, RaveOS, Linux, just a miner, and other criminal tools!
Just kidding! 😅
Everyone who wants to mine with Kryptex is welcome!
If you don't want to or can't mine on Windows with our super handy software for some reason, we've given you the option to mine the way you like!
- How to connect to Kryptex pools directly (using the email)
- How to connect HiveOS to Kryptex (universal way)
- How to connect HiveOS to XMR pools of Kryptex
- How to connect RaveOS to Kryptex (universal way)
Any questions left?
There can be even more subtleties, and it's almost impossible to cover everything. That's why we opened a Telegram channel of like-minded people!
Join us on Reddit, and our experienced users and moderators will be happy to help with questions of any complexity!
Need Help?
Have any questions, something is unclear, or you can't connect?
Contact support — we're happy to assist!
- Support Ticket.
- Telegram Support.
- Discord Support.
- Email support at support@kryptex.com.
